Downloading and Installing JDK
The first thing that you need to do to develop Android applications is to visit http://www.oracle.com/technetwork/java/javase/downloads/index.html and ensure that you have the Java JDK installed.
Downloading and Installing Eclipse
After you have successfully installed the JDK, you will need a development environment. The open source IDE Eclipse is recommended by Android directly in its documentation.
Downloading and Installing the Android SDK
After you have installed the Eclipse IDE, you need to install the Android Software Developer Kit (http://developer.android.com/sdk/index.html). This includes all the tools necessary to build
Android apps, because the SDK is not built directly into Eclipse.
Downloading and Configuring the Eclipse ADT Plug-in
After you have installed the Android SDK you need the ADT plug-in. What this does is add the features necessary to create Android Projects.

Use the Update Manager feature of your Eclipse installation to install the latest revision of ADT on your development computer. Follow these steps:
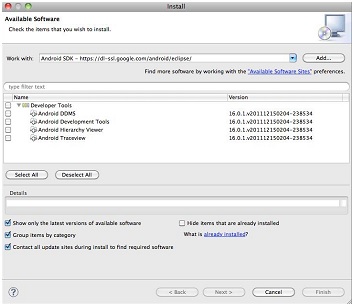
1. Start Eclipse and select Help ➪ Install New Software.
2. Click Add in the top-right corner.
3. In the Add Repository dialog box that appears, enter ADT plug-in for the name and the following URL for the location: https://dl-ssl.google.com/android/eclipse/.
4. Click OK. If you have trouble acquiring the plug-in, try using “http” in the Location URL instead of “https” (“https” is preferred for security reasons).
5. In the Available Software dialog box, select the checkbox next to Developer Tools and click Next.
6. The next window shows a list of the tools to be downloaded. Click Next.
7. Read and accept the license agreements and then click Finish. If you get a security warning saying that the authenticity or validity of the software can’t be established, click OK.
8. When the installation completes, restart Eclipse.
Once you have downloaded the ADT plug-in you need to set it up to talk to the Android SDK that you downloaded earlier. This allows Eclipse to build, run, and debug Android applications without needing to open a terminal or command shell.

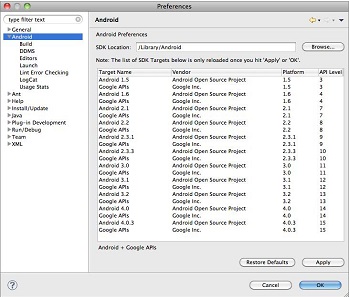
After you’ve successfully downloaded the ADT, the next step is to modify your ADT preferences inEclips e to point to the Android SDK directory:
1. Select Window ➪ Preferences to open the Preferences panel. In Mac OS X, click Eclipse ➪ Preferences.
2. Select Android from the left panel.
3. You may see a dialog box asking whether you want to send usage statistics to Google. If so, make your choice and click Proceed. You cannot continue with this procedure until you click Proceed.
4. For the SDK Location in the main panel, click Browse and locate your downloaded SDK directory.
5. Click Apply and then click OK.
Installing Additional SDK Components
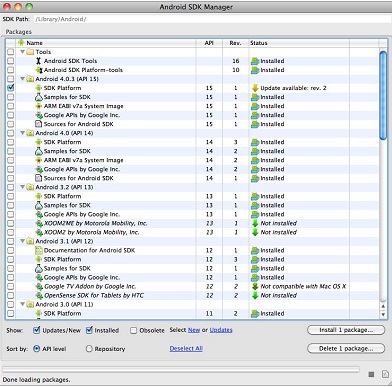
The last step in preparing your development environment for Android is to download additional
Android OS packages.

Loading the Android SDK Manager in Eclipse takes only a few steps:
1. Open Eclipse.
2. Select Window ➪ Android SDK and AVD Manager.
3. Select Available Packages in the left panel. This reveals all of the components that are currently available for download from the SDK repository.
4. Select the component(s) you’d like to install and click Install Selected.
5. Verify and accept the components you want (ensure each one is selected with a green checkmark) and click Install. The components will now be installed into your existing Android SDK directories.
