top button
Flag Notify
    Connect to us
      Site Registration

Site Registration

Understanding JavaScript Prototypes (And Creating Your Own "$" Library)

0 votes
286 views

Many web applications developed today use some or the other JavaScript library or framework. These libraries and frameworks heavily rely on what is known as JavaScript prototypes. Therefore, it would be interesting to any web developer to understand this concept. This short article explains in brief what JavaScript prototypes are and how they form an integral part of many of the popular JavaScript libraries.

It may sound bit confusing, but a JavaScript function is actually an object and it gets a few prebuilt properties. One of these properties is the prototype property. The prototype property (often referred to as a function prototype) allows you to add properties and methods to the function under consideration. (Remember what was just mentioned: functions are objects and hence can have properties and methods!)

Here’s an example that makes it clear:

function Customer() {
  this.customerID = 0;
  this.companyName = '';
  this.contactName = '';
  this.country = '';
};

The code declares a function named Customer. The Customer function declares four members - customerID, companyName, contactName and country - intended to store customer ID, company's name, contact person and country, respectively. Once created, you can instantiate and use Customer like this:

var objCust1 = new Customer();
objCust1.customerID = 1;
objCust1.companyName = 'some company name';
objCust1.contactName = 'some contact name';
objCust1.country = 'USA';
alert('#' + objCust1.customerID + ' ' + objCust1.companyName);

This code creates an instance of Customer and stores it in an objCust1 variable. When you instantiate an Customer, its members assume the values as assigned in the Customer() function. This is analogous to a constructor in C#. The code then assigns customerID, companyName, contactName and country members of Customer. Finally, values of a few members are displayed using an alert dialog. You can add more members to Customer by using its prototype property as illustrated here:

Customer.prototype.customerSince = null;
Customer.prototype.getOrderDetails = function () {
  //return order details here
  return "This customer has total 10 orders worth Rs. 1,00,000.";
}; 

The code accesses the prototype property of the Customer object and adds a customerSince member to store the date since a company is your customer. Then the code defines the getOrderDetails() method on the Customer object. The getOrderDetails() method is supposed to return some details about all the orders of a customer.

Once you add the properties and methods to the function prototype, you can instantiate and use the Customer object as follows:

var objCust2 = new Customer();
objCust2.customerID = 2;
objCust2.companyName = 'company 2';
objCust2.contactName = 'contact 2';
objCust2.country = 'IN';
objCust2.customerSince = new Date(1992, 8, 14);
var orderDetails = objCust2.getOrderDetails();
alert(objCust2.companytName + ' - ' + objCust2.customerSince + " - " + orderDetails);

This code created an object named objCust2 that is of type Customer. The code then sets properties of Customer including the newly defined customerSince and calls its getOrderDetails() method. The values are displayed back in an alert dialog.

Now, let's put this concept to use. We will build our own $ library on the lines of jQuery. Obviously, we are not going to build any rich functionality like jQuery. What our library will do is simply select a specific DOM element and make its contents appear bold, italics or underlined depending upon our instructions. The idea is to show how JavaScript prototypes are used by these popular libraries and how you too can use them in your applications. Let's get going.

Create a new web site in your favorite editor (I used Visual Studio) and add Scripts folder to it. Then add a new JavaScript file and name it MyJavaScriptLibrary.

At the top of this file define our precious gen - the $ - as shown below:

var $ = null;

JavaScript allows you create variable whose name is $. Now you must have got some hint about jQuery $ usage. Currently our $ object won't do anything because it points to null. Later we will point this $ variable to a function.

Then add the following code that creates a function named MyJavaScriptLibrary:

var MyJavaScriptLibrary = function () {
    this.targetElement = null;
}

The MyJavaScriptLibrary function (keep in mind function is an object!) defines two members targetElement and fn. The targetElement member is intended to hold a reference to a DOM element that is to be manipulated with our library.

Now, it's time to define a few functions for MyJavaScriptLibrary that will do some meaningful work. These functions are added to MyJavaScriptLibrary using its prototype object. Here is how:

MyJavaScriptLibrary.prototype.Init = function (id) {
    this.targetElement = document.getElementById(id);
}

MyJavaScriptLibrary.prototype.MakeBold = function () {
    this.targetElement.innerHTML = "<strong>" + this.targetElement.innerHTML + "</strong>";
}

MyJavaScriptLibrary.prototype.MakeItalic = function () {
    this.targetElement.innerHTML = "<em>" + this.targetElement.innerHTML + "</em>";
}

As you can see we added three functions - Init(), MakeBold() and MakeItalic() - to the prototype object. The Init() function accepts a DOM element ID and grabs that element using document.getElementById() method. The grabbed element reference is then stored inside the targetElement property we declared earlier. The MakeBold() and MakeItalic() methods simply wrap the HTML contents of the target element inside <strong></strong> and <em></em> tags respectively. This way the contents of the element will appear bold or italics.

At this stage our library is in usable state. If you wish to go ahead and test its functionality you can add a reference to MyJavaScriptLibrary.js in some HTML page and write the following code in the HTML file:

<script type="text/javascript">
  var obj = new MyJavaScriptLibrary();
  obj.Init("div1");
  obj.MakeBold();
  obj.MakeItalic();
</script>

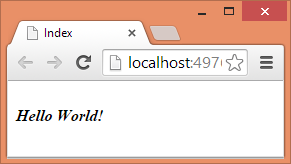
The above code assumes that there is a <div> with ID of div1 on the page above the script block. It then creates an instance of MyJavaScriptLibrary() and calls Init() method to grab the <div> for applying the effects. Then MakeBold() and MakeItalic() methods are called on the obj to make the contents of <div> appear in bold and italics. The following figure shows that our library indeed works as expected.
image

Although our library is ready it's not yet a $ library. Let's add that piece of code in the MyJavaScriptLibrary.js file.

Add the following function at the end of the code we wrote so far in the MyJavaScriptLibrary.js file.

var Wrapper = function (id) {
    Wrapper.prototype = MyJavaScriptLibrary.prototype;
    Wrapper.fn = MyJavaScriptLibrary.prototype;
    var obj = new MyJavaScriptLibrary();
    obj.Init(id);
    return obj;
}

The above code creates a function named Wrapper. As the name suggests this function simply wraps the MyJavaScriptLibrary function. It accepts id of a DOM element as a parameter.

Inside, prototype property of Wrapper function is set to the prototype property of the MyJavaScriptLibrary function. Why is this needed? That's because we want to allow for extending MyJavaScriptLibrary. This calls for access to the prototype of MyJavaScriptLibrary. By pointing prototype of Wrapper to the prototype of MyJavaScriptLibrary we ensure that such an access can be provided. We also create a shortcut to the prototype in the form of fn property. This is just to mimic what jQuery library's provides. If you worked with jQuery, you might be aware that jQuery plugins are added to the $.fn oject.

The code then creates a new object of MyJavaScriptLibrary function and calls its Init() method by passing the ID to it. Notice that Wrapper() function returns obj back to the caller.

Now the final step - add $ alias to our library. Here is how that is done:

$ = Wrapper;

The second line of code points the $ variable we declared at the top to the Wrapper function. That's it! You just developed your own $ library!!

Let's use our $ library in an HTML page.

$("div1").MakeBold();
        
$.fn.MakeUnderlined = function () {
    this.targetElement.innerHTML = "<u>" + this.targetElement.innerHTML + "</u>";
}
$("div1").MakeItalic();
$("div1").MakeUnderlined();

The above code now uses $ everywhere instead of actual function names. Remember that $ means Wrapper. So, it is basically calling Wrapper function and passes ID of the <div> to it. This is our "selector" to grab the DOM element. Remember that Wrapper return an object of MyJavaScriptLibrary and hence functions such as MakeBold() can be invoked after $("...").

Next, the code extends our $ library by adding a custom function - MakeUnderlined() - to the $.fn object. Recollect that $ is Wrapper and fn is a reference to Wrapper's prototype.

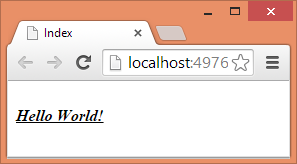
Finally, the code calls MakeItalic() and MakeUnderlined() functions. The following figure shows a sample run of the page.
image

As you can see the text is displayed in bold, italics and underlined styles.

I hope you got an idea of what JavaScript prototypes are. Our example is too simplistic as compared to full-fledged libraries such as jQuery but it does explains the basic understanding as to how prototype object can be used to extend a function by adding your own properties and methods to it.

posted Nov 16, 2016 by Shivaranjini

  Promote This Article
Facebook Share Button Twitter Share Button LinkedIn Share Button


Related Articles

What is Flot.js?

Flot is a pure JavaScript plotting library for jQuery, with a focus on simple usage, attractive looks and interactive features.

Flot is easy to use, just a few lines of code, you can make a simple line chart, it also provides a comprehensive API documentation where you can find examples, usage and methods. The most important, Flot continues to release new versions, each new version comes with new features.

You can visit the following link and see the example charts in flot.

http://www.flotcharts.org/

Example charts for flot

enter image description here

See the whole documentation for how to use by using below link

https://github.com/flot/flot/blob/master/API.md

Video for Flot.js

https://www.youtube.com/watch?v=1OJGX1VGCVQ

READ MORE

Some time back during one of my training programs I was asked this question by a beginner in ASP.NET MVC - "Can we have TempBag wrapper for TempData just as we have ViewBag for ViewData?"

Whether such a wrapper is needed or not is a different question but if you wish you can create one using dynamic objects of C# language. Here I am going to show a quick way to wrap TempData into our own TempBag and then using it in the controller and view.

The main class that does the trick is this:

public class MyTempBag : DynamicObject
{
    TempDataDictionary tempData = null;

    public MyTempBag(TempDataDictionary tempdata)
    {
        this.tempData = tempdata;
    }

    public override bool TryGetMember(GetMemberBinder binder, out object result)
    {
        try
        {
            if (tempData.Keys.Where(k => k == binder.Name).Count() > 0)
            {
                result = tempData[binder.Name];
                return true;
            }
            else
            {
                result = "Invalid TempBag Property";
                return false;
            }
        }
        catch
        {
            result = "Invalid TempBag Property";
            return false;
        }
    }

    public override bool TrySetMember(SetMemberBinder binder, object value)
    {
        try
        {
            tempData[binder.Name] = value;
            return true;
        }
        catch
        {
            return false;
        }
    }
}

The System.Dynamic namespaces provides DynamicObject class that can be used to create your own custom dynamic object. In order to create your own dynamic object using DynamicObject class you need to inherit it from DynamicObject and override three methods, viz. TryGetMember, TrySetMember and TryInvokeMember. The first two methods allow you to get and set dynamic properties whereas the last method allows you to invoke method calls on the dynamic object. In our specific case we don't need to implement TryInvokeMember because all we need is an ability to set and get properties.

The MyTempBag inherits from DynamicObject base class and accepts TempDataDictionary as its constructor parameter. The TrySetMember() method sets a TempData property value by using tempData variable. On the same lines, TryGetMember() method retrieves a TempData property value using the tempData variable.

Once you create MyTempBag class you can use it in the controller as follows:

public class HomeController : Controller
{
    dynamic TempBag = null;

    public HomeController()
    {
        TempBag = new MyTempBag(TempData);
    }

    public ActionResult Index()
    {
        TempBag.Message = "This is a test message";
        return View();
    }
}

The above code declares a dynamic variable - TempBag - inside the HomeController class. In the constructor of the HomeController this variable is set to a new instance of MyTempBag. Notice that TempData property of the controller is passed to the constructor of MyTempBag class. Once created the TempBag can be used as shown in the Index() action method.

In order to read the TempBag property inside a view you would write:

@{
    Layout = null;
    dynamic TempBag = new MyTempBag(TempData);
}

...
<html>
...
<body>
    <h3>@TempBag.Message</h3>
</body>
</html>

The view also creates an instance of MyTempBag and then reads the TempData property using TempBag object.

READ MORE

While using jQuery $.ajax you often need to perform some custom operations upon successful completion of the Ajax request. You may also need to handle errors (if any) that are thrown while issuing the request. To that end jQuery allows you to wire three callback functions as listed below:

  • success callback that gets invoked upon successful completion of an Ajax request
  • failure callback that gets invoked in case there is any error while making the request.
  • completion callback that gets invoked no matter a request completed with or without success.

Additionally, these callback functions can be attached in three distinct ways:

  • Local callbacks : Attaching callback functions as a part of $.ajax() call makes them local to the current Ajax request being made.
  • Global callbacks : Attaching callback functions at global level invokes them for all $.ajax() requests being issued from that page.
  • Promise callbacks : Attaching callback functions to the jqXHR object. This object implements Promise interface.

You can also use one or more of these ways together for an Ajax request.

Let's  quickly see how these three ways can be used. Suppose you you wish to make an Ajax request to a web form - target.aspx. The web form simply returns an HTML markup which is then displayed in a <div> element.

Using local callback functions

To attach local callback functions for success, failure and completion operations you pass them as a part of the settings to $.ajax() method. Consider the following code:

$.ajax({
  url: "target.aspx",
  type: "GET",
  dataType: "html",
  success: function (data, status, jqXHR) {
    $("#container").html(data);
    alert("Local success callback.");
  },
  error: function (jqXHR, status, err) {
    alert("Local error callback.");
  },
  complete: function (jqXHR, status) {
    alert("Local completion callback.");
  }
})

The above code shows various settings being passed to $.ajax() as a JavaScript object. Notice the success, error and complete settings. The success option points to a function that gets invoked upon the successful completion of a request. The success callnack receives three parameters viz. response data, HTTP status and jqXHR ovject. The first two parameters are straightforward. The third parameter is an object that wraps the underlying XMLHttpRequest object and is often referred as jqXHR object.

The error option points to a function that gets invoked in case an Ajax request fails. The error function receives three parameters viz. jqXHR object, HTTP status and exception object that was thrown. In a typical usage you will use the status and err parameters to display an error message to the end user.

The completion option points to a function that gets invoked once the request is complete - no matter whether it completes successfully or with an error. The completion callback receives two parameters viz. jqXHR object and HTTP status.

Using local callback functions is possible the most common approach and has an advantage of simple syntax and usage.

Using global callback functions

You can also wire global success, failure and completion callbacks with Ajax requests. These callbacks are global in that they are invoked for all Ajax requests arising from that page. They don't belong to a specific call. Consider t he following code:

$(document).ajaxSuccess(function (evt, jqXHR, settings) {
  alert("Global success callback.");
});

$(document).ajaxError(function (evt, jqXHR, settings, err) {
  alert("Global error callback.");
});

$(document).ajaxComplete(function (evt, XHR, settings) {
  alert("Global completion callback.");
});

The above code shows three methods of jQuery - ajaxSuccess(), ajaxError() and ajaxComplete() - that are invoked when the respective events happen. These functions are actually Ajax events of jQuery and hence receive an event parameter. Additionally, jqXHR object and settings that were used for making the Ajax request are passed to the event handlers. The error event handler also receives the exception that was throws.

Global callback functions are useful when you wish to perform some common task for all the Ajax requests being issued from the page. They are also useful if you wish to use $.get() and $.post() instead of $.ajax(). Since these methods don't accept error handler as a part of their signature you can't trap errors. Wiring global ajaxError() will provide an error handler for these methods also. 

Using Promise object

A bit modern way to wire these callback functions is to use JavaScript Promise object. A JavaScript Promise is an object that represents a result of an Ajax request (in fact any asynchronous request). The $.ajax() method returns jqXHR object and jqXHR implements the Promise interface. Hence, upon calling $.ajax() you can use done(), fail() and always() methods of the Promise interface to wire the respective callback functions. The following code illustrates how this is done:

var jqXHR = $.ajax({
  url: "target.aspx",
  type: "GET",
  dataType: "html",
}).done(function (data, status, jqXHR) {
  $("#container").html(data);
  alert("Promise success callback.");
}).fail(function (jqXHR,status,err) {
  alert("Promise error callback.");
}).always(function () {
  alert("Promise completion callback.");
})

The above code calls $.ajax() as before however it doesn't provide any local callback functions. The $.ajax() return a jqXHR object and three methods done(), fail() and always() are used to wire callback functions to the respective operations. The function supplied to done() is invoked with the Ajax request completes successfully. The function supplied to fail() is invoked if the request fails. The function supplied to always() is invoked irrespective of whether the request was successful or not. The done() function receives three parameters viz. response data, HTTP status and jqXHR object. The fail() function receives jqXHR object, HTTP status and the error thrown during the request. Finally, the always() function receives the same parameter as that of done() if the request succeeds otherwise it receives the same parameters as that of fail().

READ MORE
...