top button
Flag Notify
    Connect to us
      Site Registration

Site Registration

JQuery Selectors (Attributes And More Filters)

+1 vote
452 views

In the previous part, I explained basic selectors and basic filters. Now let's try to understand attribute selectors, content filters, child filters and visibility filters.

Understanding Attribute Selectors

Attribute selectors allow you to match attributes of HTML elements with certain criteria. It is not just "equal to" kind of matching but several other options are also available as outlined in the table below. The usage of attribute selector takes the following general form :

<element_name>[<attribute_name> <operator> <value_to_match>]

e.g.

a[href = "hello"]

Attribute Selector Operator Description
Attribute Equals Selector = Selects element whose specified attribute value exactly equals with a specific string value.
Attribute Not Equal Selector != Selects element whose specified attribute value doesn't match with a specific string value OR the specified attribute itself is missing.
Attribute Starts With Selector ^= Selects element whose specified attribute value begins with a specific value.
Attribute Ends With Selector $= Selects element whose specified attribute value ends with certain string value.
Attribute Contains Selector *= Selects element whose specified attribute value contains a specific string.
Attribute Contains Word Selector ~= Selects element whose specified attribute value contains a specific string as a whole word i.e. the value is separated by white space.
Attribute Contains Prefix Selector |= Selects element whose specified attribute value matches exactly equal to the specified value or that starts with the specified value followed by a - (hyphen).
Has Attribute Selector   Selects element if a specified attribute is present.
Multiple Attribute Selector   Combination of multiple attribute filters

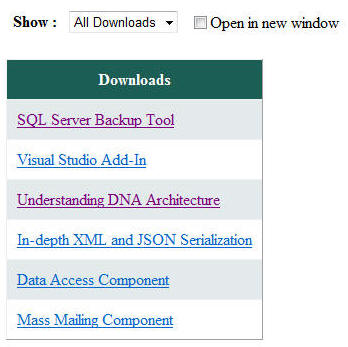
Now let's develop a simple web form that makes use of some of these attribute selectors. Our web form will look like this :
image

The web form contains a GridView with a list of download links. The downloads include products, white papers and components. At the top of the web form there is a DropDownList that allows you to filter the download links based on the category (product, white paper, component etc.). The checkbox governs whether the links are opened in the same browser window or in a separate window.

The data displayed in the grid is not coming from any database. Rather it is coming from an object collection. The code behind of the web form defines a class named Download as shown below :

public class Download
{
    public Download()
    {
    }
    public Download(string title,string url)
    {
        this.Title = title;
        this.URL = url;
    }
    public string Title { get; set; }
    public string URL { get; set; }
}

The Download class contains two public properties viz. Title and URL. The overloaded constructor allows you to quickly instantiate Download instances.

The actual data binding work happens in Page_Load event handler.

protected void Page_Load(object sender, EventArgs e)
{
    List<Download> items = new List<Download>();
    items.Add(new Download("SQL Server Backup Tool", 
     "products/Product1.aspx"));
    items.Add(new Download("Visual Studio Add-In", 
     "products/Product2.aspx"));
    items.Add(new Download("Understanding DNA Architecture", 
     "Paper-Topic1.aspx"));
    items.Add(new Download("In-depth XML and JSON Serialization", 
     "Paper-Topic2.aspx"));
    items.Add(new Download("Data Access Component", 
     "Component1-comp.aspx"));
    items.Add(new Download("Mass Mailing Component", 
     "Component2-comp.aspx"));

    GridView1.DataSource = items;
    GridView1.DataBind();
}

Here, you just create a generic List and fill it with some Download instances. You then set the DataSource of the grid to this List and call DataBind() method. Notice the URLs above carefully because later your use of attribute filters will be based on them.

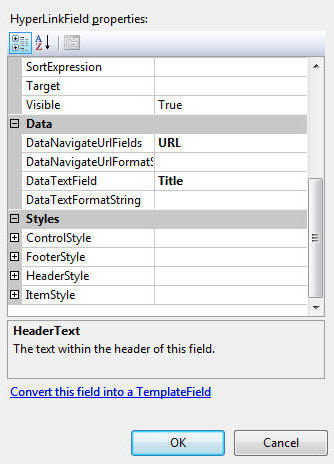
The GridView consists of a single HyperLinkField whose configuration is shown below :
image

The DataNavigateUrlFields property is set to URL and DataTextField property is set to Title.

Ok. That completes the server side part. Now let's see the jQuery part.

The complete jQuery code behind the functionality that we desire is shown below :

$(document).ready(function() {
    $("#DropDownList1").change(function() {
        switch ($("#DropDownList1").val()) {
            case "A":
                $("#GridView1 tr a").css("visibility", "visible");
                $("#GridView1 tr a").css("display", "block");
                break;
            case "P":
                $("#GridView1 tr a[href *= 'products/']").
                 css("visibility", "visible").css("display", "block");
                $("#GridView1 tr a[href |= 'Paper']").
                 css("visibility", "hidden").css("display", "none");
                $("#GridView1 tr a[href $= '-comp.aspx']").
                 css("visibility", "hidden").css("display", "none");
                break;
            case "WP":
                $("#GridView1 tr a[href *= 'products/']").
                 css("visibility", "hidden").css("display", "none");
                $("#GridView1 tr a[href |= 'Paper']").
                 css("visibility", "visible").css("display", "block");
                $("#GridView1 tr a[href $= '-comp.aspx']").
                 css("visibility", "hidden").css("display", "none");
                break;
            case "C":
                $("#GridView1 tr a[href *= 'products/']").
                 css("visibility", "hidden").css("display", "none");
                $("#GridView1 tr a[href |= 'Paper']").
                 css("visibility", "hidden").css("display", "none");
                $("#GridView1 tr a[href $= '-comp.aspx']").
                 css("visibility", "visible").css("display", "block");
                break;
        }
    }),
    $("#CheckBox1").change(function() {
        if ($("input[name='CheckBox1']").is(":checked")) {
            $("#GridView1 a:visible").attr("target", "_blank");
        }
        else {
            $("#GridView1 a:visible").attr("target", "_self");
        }
    })

})    

Let's examine the code.

The code essentially handles change events of DropDownList1 and CheckBox1 controls. The change event handler of DropDownList control consists of a JavaScript switch statement that checks for the selected value.

If the selected value is "A" i.e. show all downloads then you set the visibility CSS property of all hyperlinks to visible. This way it ensures that all types of downloads (products, components, white papers etc.) are shown in the grid. This code should be familiar to you as we used element selectors and css() function in the past examples.

If the selected value is "P" i.e. show only products then you use Attribute Contains selector (*=) to match all the anchor elements whose href attribute contains string "products/". Our URLs are such that only two entries match this criteria and you then set visibility of those links to visible.

We then use Attribute Contains Prefix selector (|=) to select white paper downloads. Notice that our URLs for white papers begin with "Paper-" but we specified only "Paper" in the selector because Attribute Contains Prefix selector selects values that are equal to OR begin with specified value plus hyphen (-). The selected links are kept hidden by setting their visibility property to hidden and display property to none. Remember that setting display to none is also necessary. If you don't set the display to none then the hyperlinks will be hidden but the empty grid rows will be still visible.

Finally, we filter component related links using Attribute Ends With selector ($=) and hide them from the user as with white paper links.

Notice how we have used css() function calls in a "chain" like fashion. It is important to remember that both of the css() calls are invoked on the return value of the selector. That means both calls are working on the same resultant elements. This is bit different than most of the programming languages such as C#. Consider the following C# code :

objEmployee.GetSalary().ToString()

What happens here? First GetSalary() method is invoked on objEmployee. ToString() method is then invoked on the return value of GetSalary() method. jQuery chaining is bit different. That is how all the calls to css() function are invoked on the returned set of element selector.

The other cases of the switch block i.e. "WP" and "C" are similar to the case we just discussed. The only difference is that they show the respective links and hide the remaining ones.

The CheckBox change event handler makes use of some other jQuery selectors. First, it filters input element whose name attribute is exactly equal to CheckBox1 using Attribute Equals selector. The is() filter checks if the checkbox is checked. Notice the use of Form selector :checked (I will cover Form selectors in detail in later parts) that returns all the checked elements. If the checkbox is checked we set target attribute of all the visible hyperlinks. The visibility filter :visible returns elements that are currently visible. The attr() method allows you to set value of an attribute and accepts two parameters. The first parameter is the name of the attribute (target in our case) and the second parameter is its value.

That's it. Run the web form and see how our jQuery code shows/hides the grid rows based on the DropDownList selection. Also check the behavior with checkbox checked and unchecked.

Understanding Visibility Filters

Visibility filters allow you to select elements based on their visibility. Two visibility selectors are :visible and :hidden. The :visible selector returns all the elements that are visible whereas :hidden selector selects all the elements that are hidden in the browser. In the preceding example you already used :visible selector so I won't cover a separate example for visibility filters.

Understanding Child Filters

Child filters allow you to work with child elements of the selected parent elements. The four selectors of this category are :first-child, :last-child, :nth-child() and :only-child. As the names suggest the :first-child filter returns the first child element, :last-child filters returns the last child element, :nth-child() filter returns a child element at a specified index and :only-child filter returns elements that are the sole child element of their parent.

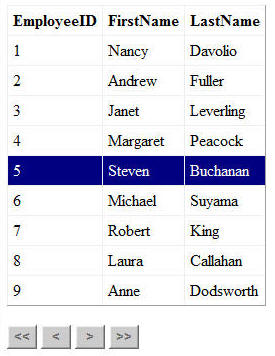
To understand how child filters work you will develop a web form as shown below :
image

The web form displays records from the Employees table of Northwind database. At the bottom there are four VCR buttons that allow you to navigate through the grid. The highlighted marker moves to an appropriate row as you click on the VCR buttons.

The jQuery code responsible for the said functionality is shown below :

var counter = 1;

$(document).ready(function() {
    $("#Button1").click(function(event) {
        counter = 1;
        $("#GridView1 tbody tr").removeClass("HighlightedRow");
        $("#GridView1 tbody tr:first-child").
addClass("HighlightedRow");
        event.preventDefault();
    })
    ,
    $("#Button2").click(function(event) {
        if (counter > 1) {
            counter--;
        }
        $("#GridView1 tbody tr").removeClass("HighlightedRow");
        $("#GridView1 tbody tr:nth-child(" + counter + ")").
addClass("HighlightedRow");
        event.preventDefault();
    })
    ,
    $("#Button3").click(function(event) {
        if (counter < $("#GridView1 tbody tr").length) {
            counter++;
        }
        $("#GridView1 tbody tr").removeClass("HighlightedRow");
        $("#GridView1 tbody tr:nth-child(" + counter + ")").
addClass("HighlightedRow");
        event.preventDefault();
    })
    ,
    $("#Button4").click(function(event) {
        counter = $("#GridView1 tbody tr").length;
        $("#GridView1 tbody tr").removeClass("HighlightedRow");
        $("#GridView1 tbody tr:last-child").
addClass("HighlightedRow");
        event.preventDefault();
    })

})

The code essentially handles click events of all the VCR buttons. A global JavaScript variable counter keeps track of the "current" row. If you click on the First button (<<) then first <tr> element that is a child of <tbody> element is returned using tr:first-child filter. The returned table row is then applied with HighlightedRow CSS class. Similarly, when you click on Last button (>>) the last row is selected using tr:last-child filter.

The click event handlers of Previous (<) and Next (>) buttons increment or decrement the counter variable as appropriate. The code then uses nth-child() selector by passing the counter variable as the child index. Remember that nth-child takes 1 based index and not 0 based.

The HighlightedRow CSS class used by above code is as follows :

.HighlightedRow
{
    background-color:navy;
    color:White;
}

Understanding Content Filters

Content filters all you to filter elements based on their content. There are four selectors in this category namely :contains(), :empty, :has() and :parent. We used :contains() filter in earlier parts to check whether an element contains certain text. The :empty selector returns all the elements that have no child elements (not even text nodes). The :has() selector returns elements that contain one or more elements matching the specified selector. Finally, the :parent selector is opposite to :empty and returns all the elements that have at least one child (that child can be a text node).

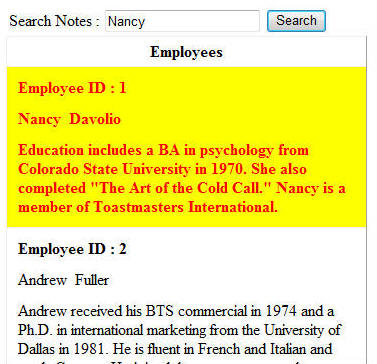
To see some of the above content filters in action we will develop a search web form as shown below :
image

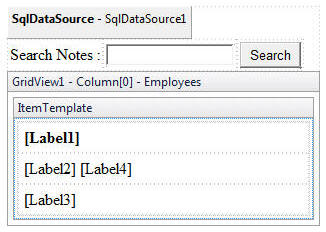
The web form consists of a GridView that displays records from the Employees table. There is a TextBox at the top that accepts a search criteria. The entered text is to be searched only within Notes and not in any other column. The grid consists of a template column as shown below :
image

The template column consists of four Label controls. Label1 displays EmployeeID, Label2 and label4 display FirstName and LastName respectively and Label3 displays Notes. Notes being a long text paragraphs we include them in <p> tag so that CSS styling for <p> (if any) gets applied to Notes also.

<td>
<p>
<asp:Label ID="Label3" runat="server" 
Text='<%# Eval("Notes") %>'></asp:Label>
</p>
</td>

Now the jQuery part. See the jQuery code below that does the searching using :contains() and :has selectors.

$(document).ready(function() {
    $("#Button1").click(function(event) {
        $("#GridView1 tr").removeClass("Highlight");
        $("#GridView1 tr:has(p:contains(" + $("#TextBox1").val() 
+ "))").addClass("Highlight");
        event.preventDefault();
    })
})

We are interested to search only notes so we check if the row elements has paragraph elements containing the search criteria as specified in the textbox. If any matching rows are found, Highlight CSS class is applied to them. The Highlight CSS class is shown below :

.Highlight
{
    background-color:yellow;
    color:red;
    font-weight:bold;
}

Because we are restricting our searching only to rows having <p> elements, if you enter Nancy as search criteria the search will be successful as Notes do contain the word Nancy. But if you enter Davolio no row is highlighted even if row containing FirstName and LastName labels contain that word.

So far we have covered majority of jQuery selectors except Form selectors and Hierarchy selectors. In the next part I will cover both of them before going to other areas. Stay tuned!

posted Nov 21, 2016 by Shivaranjini

  Promote This Article
Facebook Share Button Twitter Share Button LinkedIn Share Button


Related Articles

In Part 1 of this series you were introduced with jQuery with a simple example. Now let's move ahead and learn one of the most powerful features of jQuery - Selectors.

What are Selectors?

While working with client side script you often need to perform specific tasks to certain elements. For example, you may want to read value of a textbox whose ID is TextBox1 or you may want to display all the rows of a table in red color that contain a negative value. jQuery selectors allow you to match HTML elements against certain criteria and select them for further processing. jQuery builds on the selectors provided by CSS 3.0 and adds some of its own. jQuery selectors can be grouped into the following eight categories:

  • Basic
  • Basic Filter
  • Attribute
  • Child Filters
  • Content Filters
  • Form
  • Hierarchy
  • Visibility filters

Let's begin with the basic selectors.

Understanding Basic Selectors

Basic selectors are the elementary selectors that are widely used for selecting HTML elements. Basic selectors together allow you to :

  • Select all elements from a page
  • Select an element with a unique ID
  • Select elements with a specific CSS class attached to them
  • Select elements whose HTML tag name matches the specified one
  • Select elements based on the combination of above options

Out of the above basic selectors you have already used ID selector in the previous part. So, I will focus more on the remaining ones.

Selecting all elements from a page

The selector that allows you select all the elements from a web page is called as "all selector" and is represented by *. All selector returns all the HTML elements from the page including <head> elements. Consider a case where you have a web form with several server controls on it. You want end user to control the font family of all of the HTML elements. See the Figure below that illustrates such a web form:

image

The web form consists of two DropDownList controls, a GridView control and few Label controls. The GridView is bound with a SQL Data Source control and displays data from the Employees table of Northwind database. The DropDownLists at the top allow you to choose font-family and font size respectively. Once selected it gets applied to all the elements existing on the page. The jQuery code that does this is shown below:

$(document).ready(function() {
    $("#DropDownList1").change(
        function() {
            var fontname = $("#DropDownList1").val();
            $("*").css("font-family", fontname);
        }
    ),

    $("#DropDownList2").change(
        function() {
            var fontsize = $("#DropDownList2").val();
            $("*").css("font-size", fontsize);
        }
    )
}
)

The code shown above adds a change event handler for both the DropDownList controls. Notice the use of #<ID> to select a DOM element with a unique ID. The change event handler of DropDownList1 uses the * selector and applies a CSS style to it using css() function. The first parameter to the css() function is the CSS style property to change (font-family in this case) and the second parameter is its value. On the same lines DropDownList2 change event handler sets the font-size for all the elements. If you run the web form and try different values from the DropDownList controls you will find that every element from the web form assumes the new font-family and font-size.

Select elements with a specific CSS class attached to them

The CSS selector allows you to select elements that have certain CSS class or classes attached. Consider the following example.

image

The above web form consists of two GridView controls and display records from Employee table of Northwind database. The look and feel of GridView rows is defined by the following CSS classes :

.HeaderStyle
{
    background-color:Black;
    color:White;
    padding:5pt;
}
.RowStyle1
{
    background-color:Blue;
    color:White;
}
.AlternateRowStyle1
{
    background-color:Aqua;
    color:Navy;
}
.RowStyle2
{
    background-color:Yellow;
    color:Red;
}
.AlternateRowStyle2
{
    background-color:Maroon;
    color:White;
}

As you might have guessed, RowXXXX classes are applied to rows and AlternateXXXX classes are applied to alternating rows of the GirdViews. The HeaderStyle class controls how GridView header row is displayed. The RowXXXX and AlternateXXXX classes are attached to GridView1 as follows :

<HeaderStyle CssClass="HeaderStyle" />
<AlternatingRowStyle CssClass="AlternateRowStyle1" />
<RowStyle CssClass="RowStyle1" />

GridView2 has the other set of classes attached in similar fashion.

Now, assume that you want end user to change the look and feel of GridView controls dynamically using jQuery. To do this the web form has provision at the top where the user can select a CSS class from the DropDownList and then replace that class with different look and feel. The jQuery code that does this job is shown below :

$(document).ready
(
    function() {
        $("#Button1").click
        (
            function(event) {
                var style = $("#DropDownList1").val();
                $("." + style).css("background-color", $("#TextBox1").val());
                $("." + style).css("color", $("#TextBox2").val());
                event.preventDefault();
            }
        )
    }
)

Look at the code marked in bold letters. It uses CSS selector to select all the HTML elements that have the specified CSS class applied. The CSS class name must be mentioned with . and so we prepend it to the DropDownList value. The code then uses css() function to set new background color and text color as entered in the textboxes.

The following figure shows a sample run of the web form. Notice how GridView1 is now being displayed with different coloring.

image

You can also specify multiple CSS classes in the CSS selector as shown below:

$(".class1.class2")

Select elements whose HTML tag name matches the specified one

The element selector is a commonly used selector and allows you to get hold of all the HTML elements with a specified tag name. For example, see the web form below :

image

There is a GridView control displaying Employee records. The DropDownList at the top allows you to control text alignment of GridView columns. Moreover, when you hover the mouse pointer over a row it is displayed in highlighted color. If you click on that row an alert is displayed informing you which employee ID you clicked. The jQuery code that does the trick is shown below :

$(document).ready
(
    function() {
        $("#DropDownList1").change
        (
            function() {
                $("td").css("text-align", $("#DropDownList1").val());
            }
        )
        ,
        $("#GridView1 tbody tr").hover(function() {
            $(this).addClass('HoverRow');
        },function() {
        $(this).removeClass('HoverRow');
        }).click(function() {
            alert("You selected Employee ID :" + $("td:first", this).text());
        });

    }
)

The first line in bold letters uses element selector to fetch all the <td> elements. It then sets text-alignment of those table cells to a value as selected in the DropDownList. More interesting part, the hovering effect, is accomplished with the next block of code.

Look at the element selector here. It is actually a combination of ID selector and element selector. Here, you are selecting all <tr> elements which are inside <tbody> element of GridView1 (remember that ASP.NET GridView control is rendered as HTML table in the browser). Once selected it adds an event handler for hover() event. You could have also used mouseover() and mouseout() event handlers separately but hover allows you to do the same thing at one go. The hover() event handler takes two function references. The first one is called when mouse is over the element and the second is called when mouse comes out of the element. In our example, when mouse is over a <tr> element you add a CSS class to it named HoverRow and when mouse is out of the element you remove the class. The HoverRow CSS class looks like this :

.HoverRow
{
    cursor:hand;
    background-color:Maroon;
    color:White;
}

Notice the click() event handler of the row. To retrieve the Employee ID it uses element selector again but with a slightly different syntax. This time it gets only the first <td> element (Employee ID is the first column) from the current row and then retrieves its value using text() function.

Select elements based on the combination of above options

You can also specify a combination of above selectors together, to select matching elements. For example, consider the web form below which is similar to the previous example, except that it allows you to read Notes about an employee by clicking on the "Show Notes" button. The notes are displayed in a FormView control below the GridView as shown below :

image

If you go by previous technique of changing alignment, it will be applicable only for <td> elements. The notes in this case are displayed in a <p> element with a CSS class named .Notes applied to it. If you wish to display Notes also as per the selected alignment, you need to modify the jQuery code like this:

$(document).ready
(
    function() {
        $("#DropDownList1").change
        (
            function() {
                    $("td,.Notes").css("text-align",$("#DropDownList1").val());
            }
        )
    }
)

Notice how the selector now specifies td and .Notes i.e. element selector and CSS class selector. The .Notes class is shown below:

.Notes
{
    text-align:left;
    border:ridge 2px gray;
    padding:6px;
}

Now that you have good understanding of basic selectors, let's move on to basic filters.

Understanding Basic Filters

Basic filters allow you to filter elements typically returned by some selector. For example, you may use element selector to fetch say 10 <tr> elements but want to work with only odd or even rows at a given point of time. This can be achieved by basic filters. Some of the common basic filters are :

  • odd() - filters only odd elements from a given set
  • even() - filters only even elements from a given set
  • first() - returns the first element from a set
  • last() - returns the last element from a set
  • gt() - returns all the elements greater than a specified index from a set
  • lt() - returns all the elements lesser than a specified index from a set
  • eq() - returns the element at the specified index from a set

Let's see some of these elements in action by developing an example. The example web form is as shown below :

image

There is a GridView that displays records from Employees table. At the top there is a facility to select color scheme to be applied to the GridView. You can select a color scheme and click on the Apply button to see it in action (see below for GridView with Black & White scheme applied).

image

There is also a facility to search the city column. You can search certain records from top or bottom of the grid. The following run shows the results when you look for London city in the last 4 rows.

image

Notice how the matched city entries are marked with red color. Now, let's see the jQuery code that makes this example.

$(document).ready(function() {
    $("#Button1").click(function(event) {
        $("#GridView1 th").removeClass();
        $("#GridView1 th").addClass($("#DropDownList1").val() + "Header");
        $("#GridView1 tr:odd").removeClass();
        $("#GridView1 tr:odd").addClass($("#DropDownList1").val() + "Row");
        $("#GridView1 tr:even").addClass($("#DropDownList1").val() + "AlternateRow");
        event.preventDefault();
    })
    ,
    $("#Button2").click(function(event) {
        if ($("#DropDownList2").val() == "First") {
            $("span").css("color", "black");
            $("span:lt(" + $("#TextBox2").val() + "):contains
            ('" + $("#DropDownList3").val() + "')").css("color", "red");
        }
        else {
            $("span").css("color", "black");
            var start= $("span").length - $("#TextBox2").val() - 1;
            $("span:gt(" + start + "):contains
            ('" + $("#DropDownList3").val() + "')").css("color", "red");
        }
        event.preventDefault();
    })

})

The GridView formatting part goes inside the click event handler of Button1. Notice the use of :odd and :even filters. The :odd filter filters all the odd rows from the GridView and a CSS class is applied to the resultant set. This way alternate rows are different with different look and feel. The CSS class names that we create are BlueXXXX for Blue color scheme, RedXXXX for red color scheme and so on. This way we can just append DropDownList1 value with "Row" or "AlternateRow" and arrive at the desired CSS class name. The CSS classes are shown below:

.BlueHeader
{
    background-color:Navy;
    color:White;
    font-weight:bold;
}
.BlueRow
{
    background-color:#0066FF;
    color:White;
    font-weight:bold;
}
.BlueAlternateRow
{
    background-color:#99CCFF;
    color:White;
    font-weight:bold;
}
.RedHeader
{
    background-color:#800000;
    color:White;
    font-weight:bold;
}
.RedRow
{
    background-color:#FF0000;
    color:White;
    font-weight:bold;
}
.RedAlternateRow
{
    background-color:#FFCC99;
    color:White;
    font-weight:bold;
}
.BWHeader
{
    background-color:#000000;
    color:White;
    font-weight:bold;
}
.BWRow
{
    background-color:#999999;
    color:White;
    font-weight:bold;
}
.BWAlternateRow
{
    background-color:#CCCCCC;
    color:black;
    font-weight:bold;
}

The searching functionality makes use of :gt() and :lt() filters and :contains() content filter (more on content filters later). We first check if searching is to be done in top n rows or bottom n rows. In former case we filter all <SPAN> tags for index value less than what is specified in the TextBox3. You might be wondering why we specified <SPAN> tag. I have made the City column as a template column that displays the city value in Label control. Label control gets rendered as <SPAN> element. If you don't do this then it would have increased your computing logic slightly since there are other GridView columns also render as <td>. Once we get <SPAN> elements less than specified index we search through them using :contains() filter. The :contains() filter take a string criteria and filters all elements from the set that contain the specified criteria. The returned elements (<SPAN> tags in this case) are then applied some CSS coloring using css() function.

$("span:lt(" + $("#TextBox2").val() + "):contains
('" + $("#DropDownList3").val() + "')").css("color", "red");

If you are searching from bottom then you first need to find the start index to begin the searching. This is done as follows:

var start= $("span").length - $("#TextBox2").val() - 1;

The total number of <SPAN> elements minus what you specified in the TextBox2 gives you the index to be supplied to :gt() filter.

$("span:gt(" + start + "):contains
('" + $("#DropDownList3").val() + "')").css("color", "red");

That's it for now. All the examples I discussed above are available in the download of this article. Make sure to adjust jQuery.js file path as per your environment.

In the next part of this series I will cover some more selectors. Stay tuned!

READ MORE

After discussing Attribute selectors and many filters in the previous part let's move ahead and understand the remaining couple of selectors. So far, you know Basic selectors, Basic filters, Attribute selectors, Child filters, Content filters and Visibility filters of jQuery. In this article I cover the remaining selectors viz. Form selectors and Hierarchy selectors.

Understanding Form Selectors

Form selectors allow you to select FORM elements based on their type (textbox, checkbox, radio button etc.) or their status (selected, checked, disabled etc.). The following table list all the available Form selectors.

Form selectorDescription
:inputSelects all elements of type input, textarea, select and button
:textSelects all <INPUT> elements whose type is text
:passwordSelects all <INPUT> elements whose type is password
:buttonSelects all <INPUT> elements whose type is button as well as button elements
:submitSelects all <INPUT> elements whose type is submit
:resetSelects all <INPUT> elements whose type is reset
:imageSelects all <INPUT> elements whose type is image
:checkboxSelects all <INPUT> elements whose type is checkbox
:radioSelects all <INPUT> elements whose type is radio
:fileSelects all <INPUT> elements whose type is file
:checkedSelects all checkboxes and radio buttons that are checked
:selectedSelects all <OPTION> elements of <SELECT> element that are selected
:enabledSelects all elements that are enabled
:disabledSelects all elements that are disabled

In order to understand how Form selectors are used you will develop a web form as shown below:

image

The web form consists of a GridView that displays Employees table of Northwind database. The first two columns of the GridView are template fields. The first one contains checkboxes whereas the second one contains radio buttons. The checkbox in the header allows you to select/unselect all the checkboxes. The second column allows you to select just one radio button out of all the available ones. If you ever used radio buttons inside a GridView you are probably aware that they don't work as a single group because GridView generates different "name" for all of them. Here you will see how jQuery can be used to tackle that problem.

At the top there is a ListBox that allows you to select one or more cities. The GirdView then enables checkboxes and radio buttons only for those records and they are highlighted with some CSS class. The Clear selection button below the ListBox allows you to clear selection made in the ListBox so that GridView again shows all the records have checkboxes and radio buttons enabled.

Now let's discuss the jQuery code that makes it work.

$(document).ready(function() {
    $("#GridView1 :checkbox[id$='CheckBox2']").change(function() {
        if ($("#GridView1 :checked[id$='CheckBox2']").is(":checked")) {
            $("#GridView1 :checkbox[id$='CheckBox1']").attr("checked", "checked");
        }
        else {
            $("#GridView1 :checkbox[id$='CheckBox1']").removeAttr("checked"); 
        }
    })
    ,
    $("#GridView1 :radio[id$='RadioButton1']").change(function() {
        var newId = this.id;
        $("#GridView1 :radio[id$='RadioButton1']").each(function(index) {
            if (this.id != newId) {
                $(this).removeAttr("checked"); 
            }
        })
    })
    ,
    $("#ListBox1").change(function() {
        $("#GridView1 :input").attr("disabled", "disabled");
        $("#GridView1 input:disabled").removeClass("Focus");
        $("#ListBox1 option:selected").each(function() {
            $("#GridView1 tr:contains('" + this.value + "')").each(function() {
                $(":input", this).removeAttr("disabled");
            })
        })
        $("#GridView1 input:enabled").addClass("Focus");
    })
    ,
    $("#Button1").click(function(event) {
        $("#ListBox1 option").each(function() {
            $(this).removeAttr("selected");
        })
        $("#GridView1 :input").removeAttr("disabled");
        $("#GridView1 :input").removeClass("Focus");
        event.preventDefault();
    })

})

First we wire the change event handler for the header checkbox. To select the header checkbox you use checkbox Form selector as follows:

$("#GridView1 :checkbox[id$='CheckBox2']").change(function() {
 if ($("#GridView1 :checked[id$='CheckBox2']").is(":checked")) {
  $("#GridView1 :checkbox[id$='CheckBox1']").attr("checked", "checked");
 }
 else {
  $("#GridView1 :checkbox[id$='CheckBox1']").attr("checked", "");
 }
})

The :checkbox selector will return all the checkboxes from GridView1 but we want to deal with only the header checkbox. So, you need to use Ends With Attribute selector. The reason we need to use Ends With Attribute selector is that GridView changes the IDs of its child controls. For example, when I created this web form the checkbox in the header template was having ID CheckBox2. However, it is rendered as GridView1_ctl01_CheckBox2. Obviously "equal to" comparison will fail. Hence we use $= to get hold of the header checkbox. The change event handler then checks if the header checkbox is checked using is() method. If the checkbox is checked then we set checked attribute of all the checkboxes to checked so that all of them are checked. Otherwise, we clear that attribute so that they are unchecked.

    $("#GridView1 :radio[id$='RadioButton1']").change(function() {
        var newId = this.id;
        $("#GridView1 :radio[id$='RadioButton1']").each(function(index) {
            if (this.id != newId) {
                $(this).attr("checked", "");
            }
        })
    })

We then wire change event handler to all the radio buttons. Unlike checkbox, where we handled change event of header checkbox only, we need to handle change event on all the radio buttons because we need to ensure that only one is selected at a time. This time we use :radio form selector and then use Ends With Attribute selector ($=) to select all the radio buttons that end with RadioButton1. The ID of current radio button (i.e. the one checked by the user) is stored in a variable (newId). We then iterate through all the radio buttons and with each iteration we check if ID of that radio button matches with the one stored in newId variable. If they don't we just uncheck the radio button. Notice the use of each() method that iterates through all the elements returned by the selector. The code specified in the each() is executed for each element and for every iteration "this" refers to the element being iterated.

    $("#ListBox1").change(function() {
        $("#GridView1 :input").attr("disabled", "disabled");
        $("#GridView1 input:disabled").removeClass("Focus");
        $("#ListBox1 option:selected").each(function() {
            $("#GridView1 tr:contains('" + this.value + "')").each(function() {
                $(":input", this).removeAttr("disabled");
            })
        })
        $("#GridView1 input:enabled").addClass("Focus");
    })

Next, we handle change event of ListBox control. Remember that ListBox control of ASP.NET gets rendered as <SELECT> element. We first get hold of all the checkboxes and radio buttons using input form selector (you could have also used :checkbox and :radio separately) and we disable them by setting their disabled attribute. We then remove Focus CSS class (shown below) from all the disabled elements. For each selected option from the ListBox we execute code as specified in the each() method. The code checks if the selected city is present in any of the GridView rows. This is done using :contains() content selector. If any row is found, checkbox and radio button from that row are enabled by clearing previously set disabled attribute. For all the enabled checkboxes and radio buttons a CSS class named Focus is applied. The Focus CSS class is shown below :

.Focus
{
    background-color:orange;
    border:solid 2px red;
}

Finally we handle click event of the button that clears the ListBox selection.

    $("#Button1").click(function(event) {
        $("#ListBox1 option").each(function() {
            $(this).removeAttr("selected");
        })
        $("#GridView1 :input").removeAttr("disabled");
        $("#GridView1 :input").removeClass("Focus");
        event.preventDefault();
    })

The click event handler iterates through all the option elements of the ListBox1 and removes their selected attribute. Clearing selection from the ListBox means the grid should allow selection of all the rows. So we remove disabled attribute from all the checkboxes and radio buttons. Focus CSS class is also removed.

If you are developing data entry web forms, Form selectors will be very handy and you will be using them frequently.

Now let's move ahead and learn Hierarchy selectors.

Understanding Hierarchy Selectors

As the name suggests Hierarchy selectors allow you to work with child and sibling elements. You might be surprised but you already used one of the Hierarchy selector many times. Whenever you used $("#GridView1 something") you were actually using Descendant selector. The following table lists all the four selectors available in this category :

Hierarchy SelectorOperatorDescription
Child selector>Selects all the direct child elements of a given element.
Descendant selectorwhite spaceSelects all the direct as well as indirect child elements of a given element. Indirect child elements means grandchild, grand-grandchild etc.
Next Adjacent selector+Selects next sibling element that is immediately following a given element.
Next siblings selector~Selects all the next sibling elements of a given element.

These selectors are best understood with an example. So let's develop one.

See the web form below that represents a typical data entry page accepting details such as first name, last name and address.

image

The web form consists of six Panel controls in all. The top panels with navy border, three with red border and one that acts as a container for this whole page and is invisible in the figure. The panels and textboxes get their borders and colors via jQuery code.

$(document).ready(function() {
    $("#Container > div").css("border", "solid navy 2px");
    $("#Panel2 fieldset > div").css("border", "solid red 2px").css("margin", "10px");
    $("span + :text").css("background-color", "silver").css("border", "solid gray 1px");
    $("span ~ :text").css("font-family", "courier");
})

The container panel has ID set to Container. The first line selects all the direct child div elements of this container panel. Remember that ASP.NET Panel control is rendered as <DIV> element in the browser. Since we want direct child div elements we used > operator. This child selector gives us two panels (basic details, contact information) and we then set their border color to navy. To get hold of panels that are inside Panel2 (contact information) we again use child selector in combination with descendant selector. We have set GroupingText property of all the panels to some meaningful text (Basic Details, Contact Information and so on). When you set the GroupingText property ASP.NET emits <fieldset> and <legend> elements as shown below:

<div id="Panel2" style="text-align:center">
 <fieldset>
  <legend>
    Contact Information
  </legend>
  <div id="Panel3" style="width:300px;">
...

So Panel3, Panel4 and Panel5 are not direct child elements of Panel2. They are child elements of <fieldset> element. Hence, we need to use fieldset element in the selector. Once selected we set their border to red.

Then we use Next Adjacent selector to select all the textboxes. In our web form Label controls and textboxes are placed side by side. If you wish to select all the textboxes that are immediately next to Labels then "span + :text" will do the job. The "span + :text" selector simply means "get me all the textboxes (:text) that are placed immediately after Labels (span)". Notice that since we used Next Adjacent selector the textarea won't get selected because there is a line brake (<br />) between Landmarks label and the textarea i.e. they are not adjacent. So "span + :text" selector returns six textboxes (two from Panel1 and four from Panel3). We then set the background color for these textboxes to silver and border color to gray.

Finally, we used Next Siblings selector "span ~ :text". This selector simply means "get me all the textboxes (:text) that are anywhere after the Labels (span)". Since Next Siblings selector selects all the next siblings of an element this time even the textarea will be selected. We then set font-family of all the textboxes to courier.

That's it! We just completed all the selectors of jQuery. In the next part I will explain how the HTML page elements can be manipulated using jQuery. Stay tuned!

READ MORE
...