top button
Flag Notify
    Connect to us
      Site Registration

Site Registration

Creating Custom Cache Dependency

0 votes
247 views

Introduction

ASP.NET 2.0 offers you several ways to set a dependency between a cached item and a file(s), another cached item(s) or SQL Server database table. No doubt they satisfy most of the real world needs. However, at times the features offered by these dependencies are not sufficient. In such cases you can create your own dependency and use it instead of inbuilt ones. In this article you learn how this can be accomplished.

The Scenario

Imagine that you are developing an order processing application. The orders are received from various sources in the form of an XML file. Whenever an order is received the corresponding XML file is created on the web server. Whenever a new order is received you want some cached object to expire. At first glance you may think of setting a file based cache dependency between the new XML file and the cached object. However, there is a catch. The same folder also accepts many other XML files and you do not want to expire your item when any such files are received. Also, the names of the order files are not fixed. The only way to isolate order files from the rest of the XML files is to check the root element of the XML file. If the root element name is "order" then it is an order file and you should consider it else you need to ignore it. As you might have guessed that such logic can not be applied with the inbuilt cache dependency techniques.

The Solution

In order to tackle the above problem you need to create your own dependency. ASP.NET provides a class called CacheDependency that resides in System.Web.Caching namespace and represents the base class for all custom dependency classes. For example, the SqlCacheDependency class that represents a dependency between a cached object and SQL Server table is derived from the CacheDependency base class. The CacheDependency base class is responsible for removing an object from cache when the expiration condition is met. The CacheDependency class provides a protected method called NotifyDependencyChanged() that must be called by the inherited classes so that the dependent item gets deleted from the cache.

In our example we will create a class called MyCacheDependency that inherits from CacheDependency. Further, we will use a FileSystemWatcher to monitor the web site root folder. When any new file arrives the FileSystemWatcher will notify us by raising certain events. We will then check if the new file is an order file i.e. root element name is order. If the new file is an order file then we will call NotifyDependencyChanged() method to delete the dependent item.

Creating a custom cache dependency

To begin creating our custom cache dependency, create a new web site in Visual Studio and add a new class file called MyCacheDependency.cs in the App_Code folder. The complete source code of the class is given below:

public class MyCacheDependency:CacheDependency
{
private FileSystemWatcher watcher;

public MyCacheDependency()
{
watcher = new FileSystemWatcher
(HttpContext.Current.Request.PhysicalApplicationPath);
watcher.EnableRaisingEvents = true;
watcher.Created += new FileSystemEventHandler
(watcher_Created);
}

void watcher_Created(object sender, FileSystemEventArgs e)
{
if (Path.GetExtension(e.Name) == ".xml")
{
XmlDocument doc = new XmlDocument();
doc.Load(e.FullPath);
if (doc.DocumentElement.Name == "order")
{
base.NotifyDependencyChanged(sender, e);
}
}
}

}

Here, we created a class called MyCacheDependency that inherits from CacheDependency class. Note that the CacheDependency class resides in the System.Web.Caching namespace which must be imported at the top of your class file.

Then we declared a variable of type FileSystemWatcher. The FileSystemWatcher class residing in System.IO namespace allows you to monitor a folder for file system changes such as file creation, modification, renaming and deletion.

In the constructor of the MyCacheDependency class we set the FileSystemWatcher to monitor the root folder of the web site. We obtain physical path of the web site using PhysicalApplicationPath property of the Request object. Then we set the EnableRaisingEvents property of the FileSystemWatcher instance to true. Setting this property to true will raise several events when the monitored folder changes. We are interested to handle event related to file creation and hence we attach an event handler to the Created event of FileSystemWatcher instance.

When a new file is created on the monitored folder the FileSystemWatcher instance will raise the Created event. The event handler of Created event checks the extension of the new file. If it is an XML file (.xml) then it loads the file in an XmlDocument class. The XmlDocument class resides in the System.Xml namespace and represents the DOM parser of .NET framework. Then we check if the root element name (DocumentElement.Name) is "order" and if it is "order" then we call NotifyDependencyChanged() method of the base class CacheDependency. The NotifyDependencyChanged() method takes two parameters - sender and event argument. As the sender parameter we pass the reference of our class and as the event argument parameter we pass an empty instance of EventArgs class. Thus we send notification to CacheDependency class only if the new file is an order file.

Using the dependency

Now that we have created the custom dependency its time to use it. Add a new web form in the web site. Drag and drop a GridView control on the web form. In the Page_Load event of the web form write the following code:

protected void Page_Load(object sender, EventArgs e)
{
if (Cache["myobject"] == null)
{
string[] files=Directory.GetFiles
(Request.PhysicalApplicationPath);
MyCacheDependency cd = new MyCacheDependency();
Cache.Insert("myobject",files, cd);
}
GridView1.DataSource = (string[])Cache["myobject"];
GridView1.DataBind();
}

Here, we check if an item named myobject exist in the Cache. If it does not exist we call GetFiles() method of Directory class. The GetFiles() method returns an array of files in a specified folder. We will store this array in the cache. Then we create an instance of MyCacheDependency class and insert a new item named myobject in the cache along with the newly created dependency. The GridView control is then bound with the myobject array.

The following figure shows how the GridView looks like at run time.

image

Testing the dependency

In order to test whether our dependency is working as expected or not, create a new XML file called Order1.xml in a folder other than the web site folder. The structure of the XML file should resemble the following sample:

<?xml version="1.0" encoding="utf-8" ?>
<order>
<item>
<product>Keyboard</product>
<qty>2</qty>
</item>
<item>
<product>Mouse</product>
<qty>10</qty>
</item>
</order>

Note that the root element of the XML file is <order>. Also, create a new text file with any arbitrary text. Save both the files.

Now run the web form so that it displays a list of files as shown above. Now drag and drop the text file into the web site folder and refresh the browser window. Since we have dropped a text file the listing displayed in the grid should not change. This proves that the dependency has not yet deleted the cached object. Now drag and drop the XML file and refresh the browser window. Since we dropped an XML file and that too with <order> root element the grid will list the newly added file. This proves that the cached object was deleted and new one got created with the fresh request.

posted Dec 1, 2016 by Shivaranjini

  Promote This Article
Facebook Share Button Twitter Share Button LinkedIn Share Button


Related Articles

Dependency Injection (DI) is a technique to develop loosely coupled software systems. Although this article won't go into the details of DI as such, the basic idea is this:

Assume that there is a class Class1 that depends on Class2 and Class2 for its functioning. The normal practice is to instantiate the objects of Class2 and Class3 inside Class1 as shown below:

public class Class1
{
   private Class2 objClass2;
   private Class3 objClass3;

    public Class1()
    {
      objClass2 = new Class2();
      objClass3 = new Class3();
    }
   ....
   ....
}

Although this might work as expected it has a problem of its own - there is tight coupling between Class1 and its dependencies (Class2 and Class3). If you wish to replace Class2 and Class3 with some other implementations you need to change the code of Class1 since these objects are created inside the class.

To get away from this dependency you can do the following:

  • Base Class2 and Class3 on some interface.
  • Supply objects of classes implementing the interface (Class2 and Class3 in this case) from external world.

In other words you inject dependencies of a class from the external world. So, Class1 will look like this:

public class Class1
{
    public Class1(ISomeInterface objClass2, 
                  ISomeOtherInterface objClass3)
    {
      ....
    }
}

Ok. Now that you have some idea about DI, let's see how ASP.NET Core 1.0 allows you to work with it.

As far as ASP.NET Core 1.0 is concerned, a type to be injected is called a service. The ASP.NET Core dependency injection framework does two basic tasks for you:

  • It instantiates an object of the said service and supplies it to controllers. The dependencies can be injected through constructor injection or through property injection.
  • It handles the lifetime (when to create an object and when to dispose it) of the injected object.

There are three lifetime modes for a service being injected:

  • Singleton : An object of a service is created and supplied to all the requests to that service. So, basically all requests get the same object to work with.
  • Scoped : An object of a service is created for each and every request. So, each request gets its a new instance of a service to work with.
  • Transient : An object of a service is created every time an object is requested.

Let's see how each of these modes work.

Begin by creating a new ASP.NET Core 1.0 project as outlined. Then add an interface and a class to the Classes (or some other folder of you choice) folder:

public interface IMyServiceInterface
{
    string UniqueID { get; set; }
}

public class MyService:IMyServiceInterface
{
    public string UniqueID { get; set; }

    public MyService()
    {
        this.UniqueID = Guid.NewGuid().ToString();
    }
}

The MyServiceInterface class defines a single property - UniqueID. The MyService class implements IMyServiceInterface. The UniqueID property is set to a new GUID in the constructor of the MyService class. This way you can observe the value of UniqueID to understand the lifetime modes mentioned above.

Then add HomeController and Index view to the project.

Singleton

The DI services and their lifetime modes are registered in the Startup class. So, open the Startup class and modify the ConfigureServices() method as shown below:

public void ConfigureServices(IServiceCollection services)
{
    services.AddMvc();
    services.AddSingleton<IMyServiceInterface,MyService>();
}

Notice the line marked in bold letters. It uses the AddSingleton() method of the IServiceCollection to register MyService class as a service type. As the name suggests AddSingleton() method registers MyService with singleton mode.

Next, open the HomeController and write the following code to it:

public class HomeController : Controller
{
    private IMyServiceInterface obj;

    public HomeController(IMyServiceInterface obj)
    {
        this.obj = obj;
    }

    public IActionResult Index()
    {
        ViewBag.Obj = this.obj;
        return View();
    }
}

The HomeController constructor takes a parameter of IMyServiceInterface. Since a type that implements this interface is registered with the DI framework, an object of MyService is created and supplied to the constructor. The object reference is stored in a local obj variable for later use.

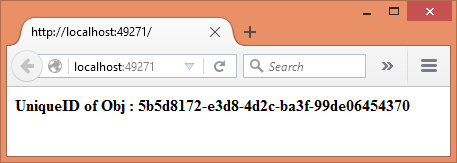
The Index() action, simply sets a ViewBag property to this injected object. The Index view outputs the value of UniqueID property as follows:

<h4>UniqueID of Obj : @ViewBag.Obj.UniqueID</h4>

If you run the application your browser should look something like this:
image

Now open another browser tab and issue another request to /home/index. You will find that both the tabs output the same UniqueID confirming that a singleton object is being created.

Scoped

To change the lifetime mode to Scoped, open Startup class again and change the call as shown below:

 services.AddScoped<IMyServiceInterface,MyService>();

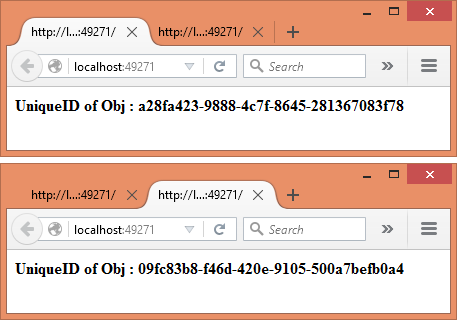
This time the code uses AddScoped() method. After making this change run the application again. Simulate multiple requests as before. This time you will find that each tab displays different UniqueID. This conforms that each request is being supplied with a new object instance.
image

Transient

To test the transient mode you need to change the Startup class like this:

services.AddTransient<IMyServiceInterface,MyService>();

This time the code uses AddTransient() method to register MyService. Now, to simulate multiple object creation requests within a single request-response cycle modify HomeController as shown below:

public class HomeController : Controller
{
    private IMyServiceInterface obj1;
    private IMyServiceInterface obj2;

    public HomeController(IMyServiceInterface obj1, 
                   IMyServiceInterface obj2)
    {
        this.obj1 = obj1;
        this.obj2 = obj2;
    }

    public IActionResult Index()
    {
        ViewBag.Obj1 = this.obj1;
        ViewBag.Obj2 = this.obj2;
        return View();
    }
}

This time the HomeController declares two variables of IMyServiceInterface. The constructor accepts two parameters of IMyServiceInterface - obj1 and obj2. This is just to simulate multiple object creation requests. The obj1 and obj2 are stored in ViewBag as before.

The Index view outputs the UniqueID from both the objects like this:

<h4>UniqueID of Obj : @ViewBag.Obj1.UniqueID</h4>
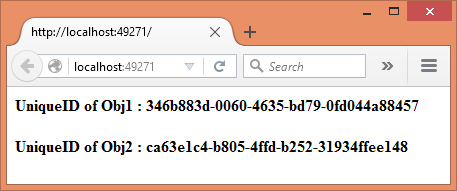
<h4>UniqueID of Obj2 : @ViewBag.Obj2.UniqueID</h4>

To test the transient mode, run the application. You will find that the two UniqueID values are different even for a single HTTP request.
image

Special case of Singleton - instance

You can register a singleton service by creating its instance yourself. In this case you are responsible for creating an object of a service. The DI framework then uses that instance in singleton mode mentioned earlier. For example, you can create an instance of MyService and register it with the DI framework. You can do so in ConfigureServices() as shown below:

public void ConfigureServices(IServiceCollection services)
{
    services.AddMvc();

    MyService obj = new MyService();
    services.AddSingleton<IMyServiceInterface>(obj);
}

As you can see, the code creates an object of MyService instead of relying on DI framework. This manually created object instance is then registered with the DI framework using an overload of AddSingleton() method. Notice that this overload accepts an object instance that is then registered as a singleton instance with the system.

You can run the application as before. You will observe that instance mode works like singleton lifetime mode - the same object instance is supplied to all the requests.

READ MORE
...