top button
Flag Notify
    Connect to us
      Site Registration

Site Registration

Executing External Applications From Your .NET Application

+1 vote
338 views

Introduction

In some cases you need to execute some external application from your own application. The common candidates for such task are:

  • Running BCP in SQL Server
  • Running batch scripts that automate some tasks
  • Start some add-in application like text editor
  • Opening read me kind of files at the end of installation

.NET provides an easy way to execute a process external to your application. In this small article we will see how to do that.


Example 1

In this example we will create a console application and see the most basic way of starting an external application.

namespace ConsoleApplicationCS
{
class Class1
{
	static void Main(string[] args)
	{
	System.Diagnostics.Process.Start("notepad.exe");
	}
}
}

The static method - Start of System.Dignostic.Process does the work of starting notepad. Note that since notepad.exe is found on path environment variable we need not give its complete path. For other applications you will have to give full path of the application.

Note : System.Diagnostics also provides classes that allow you read and write to event logs, and monitor system performance using performance counters.

Example 2

In this example we will see how to pass command line arguments to the application

namespace ConsoleApplicationCS
{
class Class1
{
static void Main(string[] args)
{
System.Diagnostics.Process.Start("notepad.exe","sample.txt");
}
}
}

Here, we passed command line arguments for the external application (notepad.exe in our case) via the second argument of the Start method

Example 3

In previous examples you must have noticed that your applications goes on once the process is started. It will not wait for the process to finish. Suppose that you are running SQL Server BCP via Start method and want to process the uploaded data later in your application then your code should not be executed till BCP is finished. In this example we will see how to wait for the process to finish its execution

namespace ConsoleApplicationCS
{
class Class1
{
static void Main(string[] args)
{
System.Diagnostics.Process p=
System.Diagnostics.Process.Start("notepad.exe","sample.txt");
p.WaitForExit();
}
}
}

Actually the Start method returns a reference to the process it starts. The reference is nothing but an instance of Process class. The WaitForExit() method of the instance will 'hold' our application from going further. You can also specify milliseconds to wait for the process if needed.

Example 4

In addition to above, we might need to set parameters like working directory and window style. The ProcessInfo class allows you to do just that. Following code shows its usage:

namespace ConsoleApplicationCS
{
class Class1
{
static void Main(string[] args)
{
System.Diagnostics.ProcessStartInfo psi=
new System.Diagnostics.ProcessStartInfo();
psi.FileName="notepad.exe";
psi.Arguments="sample.txt";
psi.WorkingDirectory="c:\\mywork";
psi.WindowStyle=System.Diagnostics.
ProcessWindowStyle.Maximized;
System.Diagnostics.Process p=
System.Diagnostics.Process.Start(psi);
}
}
}

Here, we set the initial folder or working directory for the application. We also set the window style so that the application will start in maximized window. If you want to hide the process window from the user (very useful for running batch scripts) you can set the window style to hidden.

Some Common Uses

Here are some illustrations of how you can put your knowledge at work:

  • Navigating to a web URL : The Start() method we just saw also accepts file paths or URLs. In such cases a process is started for the application to which the requested document type is associated. For example to open IE and navigate to http://www.microsoft.com you will write some thing like this
    Process.Start("http://www.microsoft.com");
    
  • Open default Email application : You can use same technique to open your default email application.
    Process.Start("mailto:somebody@somedomain.com");
    

Killing a Process

In some rare cases you may need to kill the process you started. You can use Kill() method of the process instance as shown below:

System.Diagnostics.Process p=
System.Diagnostics.Process.Start("notepad.exe","sample.txt");
//some other code
p.Kill();
posted Dec 28, 2016 by Shivaranjini

  Promote This Article
Facebook Share Button Twitter Share Button LinkedIn Share Button


Related Articles

Introduction

Message Queing provides asynchronous programming model for your applications. For distributed and internet applications whene immediate response is not required from the actual server message quing can be used. This makes your application robust as message delivary is guranteed even if the remote server is out of service.

Namespaces involved

The message quing functionality is available from classes found in System.Messaging namespace. You have to import it in your application.

Imports System.Messaging

Setting up message queues

Before working with message queues you must first create and configure them on your machine. The detailed explanation of creating and configuring is out of scope of this article. I will assume that you have a private queue called MyQueue configured on your machine.

Sending data to message queue

Following code illustrates how to send an entire file to a message queue :

Dim objMsgQ As New MessageQueue
("WIN2000\private$\MyQueue")
Dim newMessage As New System.Messaging.Message()
Dim fs As Stream
fs = File.Open("somepath", FileMode.Open)
newMessage.BodyStream = fs
objMsgQ.Send(newMessage)
fs.Close()
  • We have created instance of MessageQueue and Message classes. The MessageQueue class represents our private queue MyQueue. The Message class represents the actual message i.e. the data that is to be sent over the queue.
  • We then open a local disk file and the file stream is assigned as input to the message BodyStream. In case of simple data like strings you can use other overloaded forms of the Send method.
  • We then sent the data using the Send method of the message queue.

Receiving data from message queue

Now, let us see how to read back the above file once sent into the queue :

Dim mq As MessageQueue = New MessageQueue
("WIN2000\private$\MyQueue")
Dim m As System.Messaging.Message
Dim fs As FileStream
Dim en As New ASCIIEncoding()
Dim data As Integer
Dim s As Stream

m = mq.Receive(New TimeSpan(0, 0, 3))
s = m.BodyStream
fs = File.Create("somepath")
While True
	data = s.ReadByte()
	If data = -1 Then
		Exit While
	End If
	fs.WriteByte(data)
End While
s.Close()
fs.Close()
  • As usual we have created variables of type MessageQueue and Message.
  • We then call Receive method of message queue that actually fetches a message from the queue. We have also specified timeout value for the receive method.
  • We then read BodyStream of the received message and write it to another local file.
READ MORE

Introduction

There are developers who write code and then there are developers who write better code. The difference is obvious. Writing good code is skill that not all developers have. This also implies that this skill can be improved. A part of this skill includes ability to refactor the code that you or somebody else has written. VS.NET 2005 includes a set of features that help you in this regards. This article is going to discuss what refactoring is and how VS.NET 2005 helps you to refactor your code.

What is refactoring?

As a developer all of us write code in one or the other language. Often the code we write is not the best piece of software in terms of its organization, arrangement, readability and structure. When we (or somebody else) review our own code we realize that it needs to be improved or even rewritten at certain places. This process of improving our code is called as refactoring. Note that the term refactoring implies that we are improving the code without changing its intended functionality or meaning.

Some of the common refactoring tasks include:

  • Changing signature of methods
  • Renaming variables
  • Creating interfaces out of existing code
  • Convert a block of code into a separate method

Refactor menu

Now comes the interesting part. VS.NET 2005 includes a menu called "Refactor" that helps you to perform many of the common refactoring tasks. The following figure shows the Refactor menu and its items.

image

Renaming variables, properties and methods

Many times it happens that after writing huge amount of code you feel like changing names of variables, properties and methods involved. Common reason being improved readability. The traditional approach is to use "Find and Replace" option from edit menu. Unfortunately our code is not a work document and invoking "Find and Replace" may not prove useful. Moreover chances of accidentally replacing unintended tokens are high (recollect how often you used Ctrl+Z after that mighty Replace All command). The Rename menu option from the Refactor menu helps you do this task easily.

You need to go the variable or property or method name that you intend to change and select "Rename" menu option. This will open a dialog as shown below:

image

You can enter the new name for the variable, property or method and click OK to change it everywhere. You can also preview the changes before you apply them. The following figure shows the preview dialog. See how you can uncheck the locations where change is going to occur.

image

Additionally you can control if you want to change the name in comments and string literals.

Extracting a method

Consider a typical scenario. You start coding a lengthy method consisting of some complex sets of algorithms. After completing the method you realize it has become huge and complex enough that other team members can not understand it with ease. Hence, you decide to break it down in multiple small functions. This not only simplifies your code but also improves its readability and maintainability. The "Extract Method" option of Refactor menu does the job for you.

In order to use this menu option you must select a block of code that you want to separate out as a method and then click on the "Extract Method" menu option. The following figure shows the extract method dialog.

image

Once you enter the name of the new method to be created and click OK it does two things for you:

  • It creates a new method as per your choice and places all the selected code inside it

  • It replaces the selected lines with a call to this newly created method

Creating properties that wrap class level variables

Let's accept the fact that many developers have habit of exposing class level variables (fields) to the external world. As per object oriented programming one should allow access to variables only through properties or methods. Such circumstances can be dealt with the help of "Encapsulate Field" option of Refactor menu.

Select the class level variable that you want to wrap inside a property and choose the "Encapsulate Field" option. This will open a dialog as shown below:

image

You need to enter the property name and decide if you want to update the references to the variable from outside the class or from outside as well as inside of the class. Just like Rename dialog you can preview the changes before applying.

Extracting interfaces

Sometime it happens that after coding a class you realize that there are going to be other classes bearing similar structure but different implementation. This is a perfect case for interfaces and "Extract Interface" option from Refactor menu does the job for you.

You need to be in the class and select "Extract Interface" to pop up a dialog as shown below:

image

You need to specify the name of the interface, the file name in which to store the interface and the members to be included in the interface. Clicking on OK creates a new file and creates an interface within in. Also, the class from which you extracted the interface is automatically marked to be implementing the interface.

Promoting local variables to method parameters

Another common scenario is converting local variables from a method as method parameters. In this case "Promote local variable to parameter" option of the Refactor menu comes handy. Simply place your custom at the line where you have declared the variable and click on this option. You fill find that the variable now appears as a method parameter and all the calls to the method get updated accordingly. Note that in order for this option to work it is necessary to initialize the variable to some value.

Removing method parameters

They way you may need to promote local variables as method parameters, you may also need to remove some or all method parameters (changes are always unexpected you know). In such cases "Remove Parameters" option from Refactor menu comes handy.

You need to be inside the method whose parameters are to be removed and select "Remove Parameters" option. This will bring a dialog as shown below:

image

You can then remove the required parameters. The good part is that all the method calls as well as interface definitions will also be updated according to the new signature. As before you can preview changes before applying.

Reorder method parameters

Adding method parameters, removing them is fine. But what about re-ordering them? Don't worry. There is "Reorder Parameters" option that does just that. This option works only for methods with two or more parameters. When selected it opens a dialog as shown below:

image

You can move the parameters up or down and see the preview as before. As with remove parameter option all the method calls automatically get updated as per the new order of parameters.

Summary

Refactoring is important and common requirement in many development scenarios. VS.NET 2005 provides necessary tools to quickly refactor your code and improve its overall organization, structure and readability.

READ MORE

Introduction

Since their introduction ASP.NET application services are popular and widely adopted means to implement membership, profile and role based security in web applications. Starting from .NET framework 3.5, Windows applications can also avail these features under the banner of Client Application Services. In this article I will show you how these services can be consumed in Windows Forms applications.

When to use Client Application Services?

Client application services allow you to do the following tasks:

  • Authenticate users
  • Implement role based security
  • Read and write Web settings (Profile) for a user

Client application services can be used in the following situations:

  • When you wish to share the same user credentials between web and windows applications
  • While developing a smart client application
  • When part of the system is web based and part of it is Windows based

It should be noted, however, that client application services are not standalone equivalent of application services for Windows applications. They are designed to allow Windows application share the same set of users that a web site is using.

Namespaces involved

The System.Web.Extensions assembly provides two namespaces related to client application services:

  • System.Web.ClientServices
  • System.Web.ClientServices.Providers

The former namespace contains classes that provide support to the ASP.NET application services. The later namespace contains classes related to client service providers.

Implementation steps

In order to make use of the client application services you need to take the following steps:

  • Configure database to support application services
  • Create a web site application
  • Configure membership, role and profile providers
  • Expose ASP.NET application services to Windows applications
  • Create a Windows Forms application
  • Enable client application services in the Windows Forms application
  • Retrieve profile properties in the Windows Forms application
  • Consume client application services

Let's develop a simple example that implements all the above steps.

Configure database to support application services

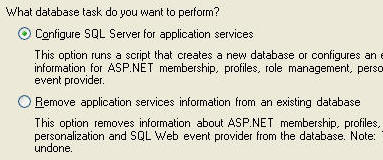
In order to configure a database to support ASP.NET application services you need to run aspnet_regsql.exe command line tool. If you ever used application services before you should be familiar with this command. Running this tool starts a wizard that guides you to further steps. The following figure shows the initial wizard step.
image

This tool creates several tables and stored procedures in the specified database that are used by ASP.NET application services.

Create a web site application

Now create a new web site using Visual Studio. In real world scenario this will be a functional web site. Since our intention is to illustrate the user of client application services we will not develop any web form in the web site. You can safely delete all the web forms from this web site. You nevertheless need to create the web site because it is this web site that expose the ASP.NET application services to Windows Forms application.

Configure membership, role and profile providers

The next step is to enable Forms authentication and configure membership, role and profile providers. Open web.config of the web site you just created and add the following markup to it.

<authentication mode="Forms"/>

<membership defaultProvider="p1">
<providers>
<add name="p1" connectionStringName="connstr" 
type="System.Web.Security.SqlMembershipProvider"/>
</providers>
</membership>

<roleManager enabled="true" defaultProvider="p2">
<providers>
<add name="p2" connectionStringName="connstr" 
type="System.Web.Security.SqlRoleProvider"/>
</providers>
</roleManager>

<profile enabled="true" defaultProvider="p3">
<providers>
<add name="p3" connectionStringName="connstr" 
type="System.Web.Profile.SqlProfileProvider"/>
</providers>
<properties>
<add name="FullName" type="string" 
readOnly="false" defaultValue="abcd" 
serializeAs="String" allowAnonymous="false"/>
</properties>
</profile>

Here, we first enabled Forms authentication for the web site. Then we configure membership, role and profile providers using <membership>, <roleManager> and <profile> tags. Make sure that the connection string connstr points to your database that you configured for application services. Notice that the above markup defines one profile property named FullName that is of type string.

Expose ASP.NET application services to Windows applications

Now comes the important step. In order that Windows applications can consume ASP.NET application services you must expose them from your web site. This is done by adding <system.web.extensions> section inside <configuration> root element.

<system.web.extensions>
<scripting>
<webServices>
<authenticationService 
enabled="true" requireSSL="false"/>
<roleService enabled="true"/>
<profileService enabled="true" 
readAccessProperties="FullName" 
writeAccessProperties="FullName"/>
</webServices>
</scripting>
</system.web.extensions>

Notice the markup shown in bold letters. The <authenticationService>, <roleService> and <profileService> tags expose membership, role and profile services to the external world.

If you worked in ASP.NET AJAX you should be familiar with this markup as AJAX consumes the same services from client side script.

Observe the <profileService> markup carefully. The readAccessProperties and writeAccessProperties attributes govern which profile properties can be read and write respectively.

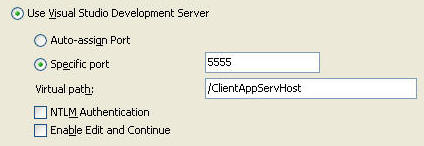
In real world cases you will be deploying this web site to a known URL. For the sake of testing however we need to tell Visual Studio the port number to use for running this web site. This is done in the web site property pages as shown below:
image

Make sure to specify a specific port (5555 in the above figure) and a virtual path (/ClientAppServHost). This way at runtime the URL of our web site will be http://localhost:5555/ClientAppServHost.

Create a Windows Forms application

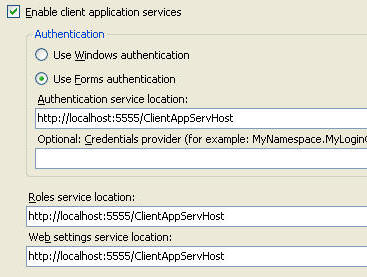
The next step is to add a new Windows Forms application to the current Visual Studio solution. Open its property pages and locate Services tab. This tab allows you to enable client application services for the Windows application. Ensure that the "Enable client application services" checkbox is checked. Also, specify authentication service location, roles service location and web settings (Profile) service location to http://localhost:5555/ClientAppServHost.
image

This way the Windows Forms application knows how to connect with the appropriate membership, roles and profile provider.

Retrieve profile properties in Windows Forms application

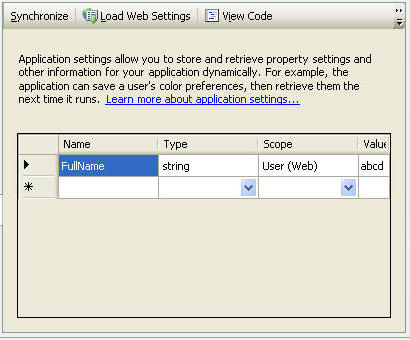
In order to access profile properties in Windows applications in strongly typed fashion you need to retrieve them from the web site. To do so open properties tab of the Windows application and select its Settings tab.
image

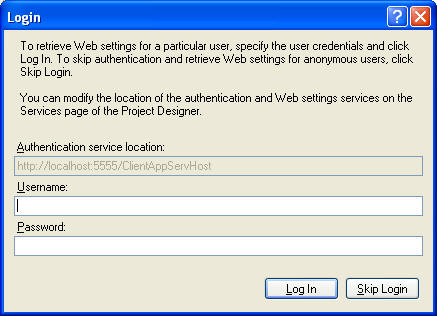
Click on "Load Web Settings" option to open a login dialog as shown below:
image

Enter user ID and password of any one user of the web site and click "Log In". This will load profile properties in the grid of Settings tab (see Settings tab screenshot above).

Consuming client application services

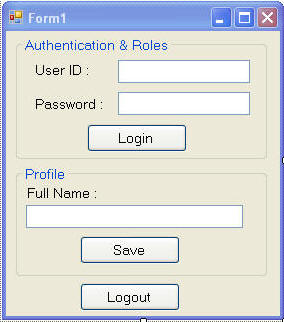
Now we arrive at the last step. Design the default Windows form from your application as shown below:
image

In the Click event handler of Login button add the following code:

private void btnLogin_Click
(object sender, EventArgs e)
{
string msg = "Welcome ";
if (!Membership.ValidateUser(txtUserID.Text, 
txtPassword.Text))
{
MessageBox.Show("Invalid User ID or Password!");
}
else
{
msg = msg + txtUserID.Text;
}
if (Thread.CurrentPrincipal.IsInRole("Manager"))
{
msg = msg + " [Manager]";
}
if (Thread.CurrentPrincipal.IsInRole("Operator"))
{
msg = msg + " [Operator]";
}
MessageBox.Show(msg);
...
txtFullName.Text = Properties.Settings.
Default.FullName;
}

Here, we used Validate() method of membership class to check if the user ID and password are valid. If so you check if the user belongs to Manager role. This is done using IsInRole() method of the Principal object of current thread. This principle is automatically populated with appropriate identity and role information. Finally, FullName profile property is read using Settings collection. Notice how the FullName property is accessed in typed fashion.

Now add the following code in the Click event handler of Save button.

private void btnSave_Click
(object sender, EventArgs e)
{
Properties.Settings.Default.FullName 
= txtFullName.Text;
Properties.Settings.Default.Save();
}

The code sets the FullName profile property to the new value and calls Save() method. This way the new value gets stored in the database.

Finally add the following code in the Click event hander of Logout button.

private void button3_Click
(object sender, EventArgs e)
{
ClientFormsAuthenticationMembershipProvider 
authProvider = 
(ClientFormsAuthenticationMembershipProvider) 
Membership.Provider;
authProvider.Logout();
...
}

The code accesses membership provider using the Provider property of Membership class. This provider is of type ClientFormsAuthenticationMembershipProvider, a class residing in System.Web.ClientServices.Providers namespace. Logout() method of the provider is then called.

That's it. To test the application create couple of users and roles in the web site using Web Site Administration tool and run the Windows Forms application.

READ MORE
...