Tables
Tables allow you to view your data in a structured and classified format. Tables can contain any type of data such as text, images, links, and other tables. You can create tables for displaying timetables , financial reports, and so on.
A table is made up of rows and columns. The intersection of each row and column is called as a cell. A row is made up of a set of cells that are placed horizontally. A column is made up of a set of cells that are placed vertically.
You can represent your data in a tabular format by using the TABLE element in HTML. The TR element divides the table into rows and the TD element specifies columns for each row. By default, a table does not have a border. The border attribute of the TABLE element specifies a border for making the table visible in a web page.

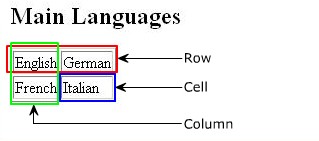
Note: The above code is use for to create a table. The border attribute of table element gives a border to the table, which is 1 pixel wide. The TR element within the TABLE element creates rows. The ID element creates two cells with the values English and German in the first row and French and Italian in the second row.
Table Headings
You can specify the heading for each column in HTML. TO specify the heading for columns in a table, you use the TH element. The text included within the TH element appears in bold.
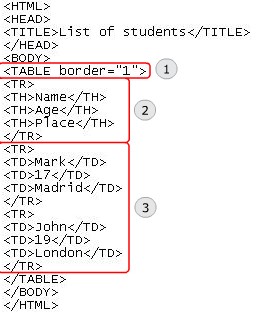
The code displayed in the graphic creates a table with a heading. To create a table:
1. The TABLE element creates a table with a border of 1 pixel
2. The TH element provides three column headings namely Name, Age, and Place.
3. The second and the third rows list the details of the students in the three columns.
“Colspan” Attribute
You might feel the need to span two or more cells while working with tables. Spanning refers to a process of extending a cell across multiple rows or columns. To span two or more columns, you use the colspan attribute of the TD and TH elements.
The colspan attribute allows you to span a cell along a horizontal row. The value of the colspan attribute specifies the number of cells across which a specific cell shall be expanded.
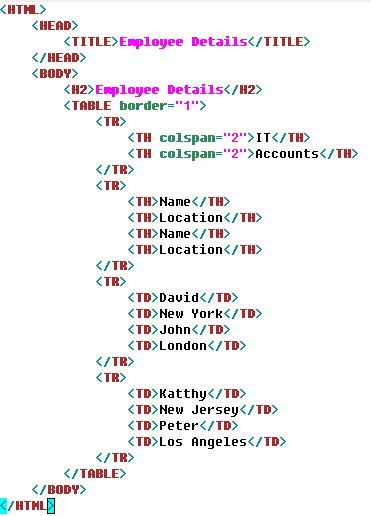
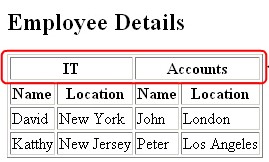
Note: The code creates a tale with a border of 1 pixel. The TH element specifies two column headings namely Information Technology and Accounts. Each of these header cells horizontally span across the two cells by setting the colspan attributes of the TH element to 2. Each of these headings has two sub-headings namely Name and Location, which specify the name and location of employees.
“rowspan” Attribute
The rowspan attribute spans a data cell across two or more rows. It allows you to span a data cell along a vertical column. Like the colspan attribute, the rowspan attribute can be used within the TD and TH elements.
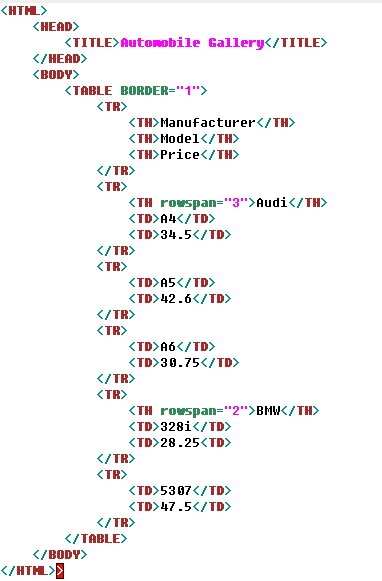
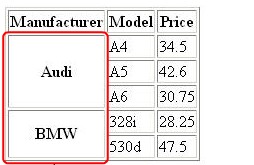
Note: The code creates a table with a border width of 1 pixel. The three TH elements within the TR element specify column headings namely Manufacturer, Model, and Price. The rowspan attribute of the TH element combines the three rows of the Manufacturer column into a common brand namely Audi. The three different models and the respective prices of the Audi brand are displayed in three different rows. Similarly, the rowspan attribute of the TH element combines the next two rows of the Manufacturer column into a common brand called BMW.
Horizontal Alignment
Alignment determines the representation of text along the left, right, or center positions. In HTML, by default, the data within the table is aligned on the left side of the cell. Sometimes, you might need to align the data to some other position for improving the readability or focusing on some data. To horizontally align the contents of the cell, you use the align attribute. The four possible value of the align attribute are:
- Left: Aligns the data within the cell on the left side. This is the default value for table content.
- Center: Aligns the data within the cell on the center. This is the default value for table headings.
- Right: Aligns the data within the cell on the right side.
- Justify: Aligns the data within the cell by adjusting the text at the edges.
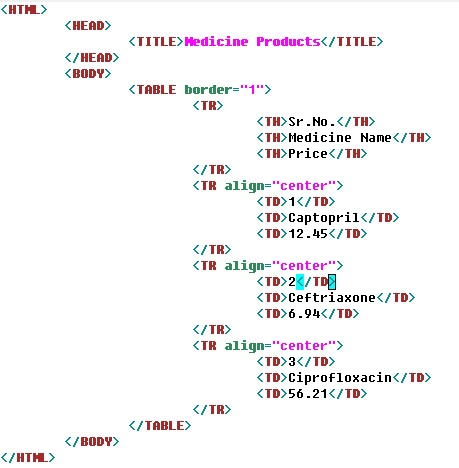
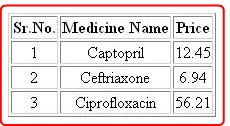
Note: The code uses the align attribute inside the TR element to align the data within the row. The table content is center aligned by setting the value of the align attribute to center.
Vertical Alignment
You can vertically align the position of data by using the valign attribute. The valign attribute can be used with TD, TR, and TH elements. The possible values of the valiign attribute are:
- Top: Aligns the data within the cell at the top.
- Middle: Vertically aligns the data within the cell at the center.
- Bottom: Aligns the data within the cell at the bottom.

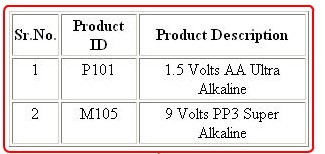
Note: The code creates a table by specifying the width attribute as 300. The width attribute specifies the width of a table. The align attribute is set to the value cinter, which specifies that the data within the rows are centrally aligned. The valign attribute is set to the value top, which specifies that the data within the cell will be aligned at the top.
Margin Attributes
The data in a table might appear cluttered, which may affect the readability. This might make it difficult to comprehend data as the data. To overcome this issue, you use the cell margin attributes. The two cell margin attributes that can be used within the TABLE element are:
- Celpadding: Defines the space between the contents of the cell and the edges of the cell. The default value is 1.
- Cellspacing: Defines the space between the table cells. The default value is 2.
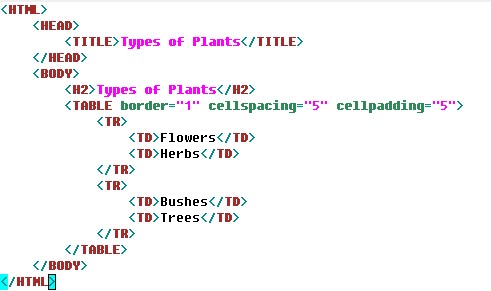

Note: The code creates a table and the value of the cellspacing attribute within the TABLE element is set to 5. This indicates that the space between two table cells should be 5 pixels wide. The cellpadding attribute is set to 5, which indicates that the space between the contents of the cell should be 5 pixels wide.
“CAPTION” Element
You can add a heading to a table in HTML. To specify the main heading for your table, you use the CAPTION element. The CAPTION element defines a caption for your table. It is a sub-element of the TABLE element. Unlike the TH element that is used to specify a heading to an individual row or column, the CAPTION element allows you to specify a title for your entire table.
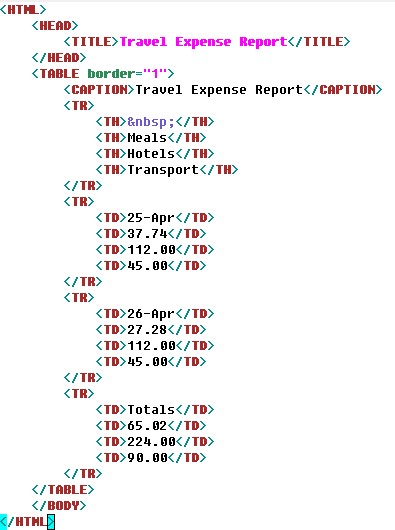
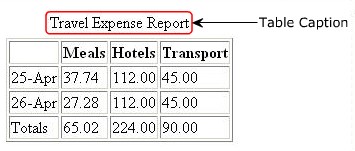
Note: The code creates a table of border width of 1 pixel. The CAPTION element that is used inside the TABLE element specifies a caption to the entire table as travel expense report.
For more go through this video:
https://www.youtube.com/watch?v=em5zhA4Of3w


