top button
Flag Notify
    Connect to us
      Site Registration

Site Registration

Working with HTML document

0 votes
570 views

Basic Text Elements

A web page is a collection of information that consists of text, graphics hyperlinks, and so on. This information needs to be arranged in a proper manner by specifying headings, forming paragraphs, and applying proper line breaks. Such a layout provides a logical flow to the contents and makes the web page comprehensible. HTML provides you with the five basic text elements to make your web pages according to a logical flow. These basic text elements are:

  • P: The P element is a container element that defines a paragraph under the <P> and </p> tags. The <P> tag automatically inserts a blank line before and after the paragraph in an HTML page.
  • BR: The BR element is an empty element that inserts a line break. Line breaks are useful when you do not want to start a new paragraph but want to break the line or the paragraph. You insert a line break by just specifying the <BR/> tag.
  • H1 - H6: The heading elements are container elements that specify heading of different sizes. A blank line is always added above and below the heading. The different heading levels are H1, H2, H3, H4, H5, and H6.
  • HR: The HR element is an empty element that specifies a horizontal line, which appears across the web page. A horizontal line is used to divide the HTML page horizontally and it is specified as <HR/>.
  • PRE: The PRE element is a container element that specifies preformatted text. This means that the text within the element is displayed in the browser in the same manner as it is written under the element. Here, the white spaces and line breaks are preserved.


Using the Text Elements

The code uses the commonly used text elements to display a textual content on the web page. All the textual information is placed within the <P> and </P> tags. The HR element displays a horizontal rule after paragraph title, Decimal Number System. By default, the P element inserts a blank line before and after the paragraphs. The <BR> element inserts a line break between the second paragraph and the last line on the web page.


Heading Levels

The heading elements define headings for contents such as text and images. They specify a hierarchical structure of a web page by grouping the contents into different headings. HTML defines six levels of heading that ranges from H1 to H6. The H1 element specifies the top-level heading, which is displayed with the largest size. The H6 element specifies the lowest-level heading, which is displayed with the smallest size.


Basic Formatting Elements

  • B: The B element displays the text in bold. The text that needs to be displayed in bold is enclosed between <B> and </B> tags.
  • BIG: The BIG element makes the text appear larger in a browser. The text that needs to be displayed larger is enclosed between <BIG> and </BIG> tags.
  • I: The I element displays the text in italic. The text that needs to be displayed as italic is enclosed between <I> and /I> tags.
  • SMALL: The SMALL element makes the text appear smaller in a browser. The text that needs to be displayed smaller is enclosed between <SMALL> and </SMALL> tags.
  • U : The U element applies an underline to the text. The text that needs to be underlined is enclosed between <U> and </U> tags.
 

Updating and Shifting Text

You might want to display some text or characters above or below the baseline of its adjacent text. Further, you might want to strike through some text to indicate that it is deleted. Therefore, HTML provides you some more formatting elements. These formatting elements are:

  • DEL: The DEL element encloses text, which has been deleted from the document. The text to be deleted is placed in the <DEL> and </DEL> tags.
  • INS: The INS element encloses text, which has been inserted in the document. The text to be inserted is placed in the <INS> and </INS> tags. The INS element can be used with DEL element to inform the user about the deleted text, which is replaced by the new text.
  • STRONG: The STRONG element emphasizes the text as compared to its surrounding text. The text to be emphasized is placed in the <STRONG> and </STRONG> tag.
  • SUB: The SUB element displays the text as subscript. The text to be displayed as subscript is enclosed in <SUB> and </SUB> tag.
  • SUP: The SUP element displays the text as superscript. The text to be displayed as superscript is enclosed in <SUP> and </SUP> tag.
 

“Style” Attribute

A style is a way to specify the visual appearance of the content. Web pages display contents in different styles such as in different colors, fonts, sizes, and borders. This is done using the style attribute, which makes the web page look more attractive and pleasing. This attribute is used with most of the HTML elements and is specified within their start tags. Such a manner of specifying styles is referred to as inline CSS.

Cascading Style Sheet (CSS) is a style sheet used for specifying various styles for HTML elements. The style attribute cannot be used with the HTML, HEAD, META, and TITLE elements.

The syntax demonstrates how to specify the style attribute.

Style=”property:value”

where,

Style: is the predefined attribute for most of the HTML elements.

Property: Specifies the style to be applied.

Value: Specifies the value of the property.

See the given tutorial :-


posted Jun 5, 2017 by Khushboo Kumari

  Promote This Article
Facebook Share Button Twitter Share Button LinkedIn Share Button


Related Articles

AngularJS

AngularJS is an open source JavaScript framework that allows to move the presentation logic on the client side and thus separate it from the logic of the application that remains on the server. AngularJS aims to minimize this complexity by offering a great environment for development, as well as the means to test your apps. 

AngularJS

Pre-request Language

  • HTML
  • CSS
  • JavaScript

Start your First HTML page with AngularJS

AngularJS is distributed as a JavaScript file, and can be added to a web page with a script tag:


<!DOCTYPE html>

<Html>

<script src="https://ajax.googleapis.com/ajax/libs/angularjs/1.6.4/angular.min.js">

</script>

<Body>

<div ng-app="">

  <p>Addition of 5 and 7 = {{5 + 7}} </p>

</div>

</body>

</html>


AngularJS Applications

Data Binding

Data-binding is an automatic way of updating the view whenever the model changes, as well as updating the model whenever the view changes. 


Controller

AngularJS controller to control the flow of data in the application. AngularJS controller is defined with ng-controller directive. AngularJS controller is a JavaScript object containing attributes/properties and functions. 


<!DOCTYPE html>

<html>

<script src="https://ajax.googleapis.com/ajax/libs/angularjs/1.6.4/angular.min.js">

</script>

<script>

//AngularJS Module

var app = angular.module('myApp', []);

//AngularJS Controller

app.controller('myCtrl', function($scope) {

    $scope.firstName= "Atindra";

    $scope.lastName= "Nath";

});

</script>

<body>

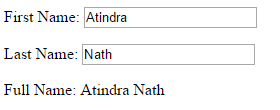
      <div ng-app="myApp" ng-controller="myCtrl">

      First Name: <input type="text" ng-model="firstName"><p/>

      Last Name: <input type="text" ng-model="lastName"><p/>

      Full Name: {{firstName + " " + lastName}}

      </div>

</body>

</html>

Output
Separating Controller and Module files

<html>

<head>

<script src="https://ajax.googleapis.com/ajax/libs/angularjs/1.6.4/angular.min.js"></script>

<script src="module/moduleScript.js"></script>

<script src="controller/controllerScript.js"></script>

</head>

<body ng-app="myApp" ng-controller="myCtrl">

      <div ng-controller="myCtrl">

      First Name: <input type="text" ng-model="firstName"><p/>

      Last Name: <input type="text" ng-model="lastName"><p/>

      Full Name: {{firstName + " " + lastName}}

      </div>

</body>

</html>

//AngularJS Module File (moduleScript.js)

var module = angular.module('myApp', []);

//AngularJS Controller (controllerScript.js)

module.controller('myCtrl', function($scope) {

    $scope.firstName= "Atindra";

    $scope.lastName= "Nath";

});


AngularJS Directives

AngularJS directives are extended HTML attributes with the prefix ng-.

  • ng-app − This directive starts an AngularJS Application.
  • ng-init − This directive initializes application data.
  • ng-model − This directive binds the values of AngularJS application data to HTML input controls.

ng-repeat − This directive repeats html elements for each item in a collection.


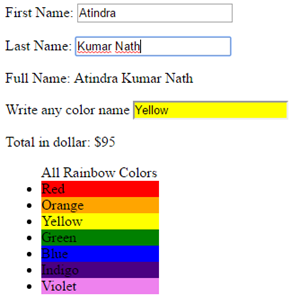
<body ng-app="myApp" ng-controller="myCtrl">

      <div>

      First Name: <input type="text" ng-model="firstName"><p/>

      Last Name: <input type="text" ng-model="lastName"><p/>

      Full Name: {{firstName + " " + lastName}}

      </div>

            <p ng-init="myCol='blue'">Write any color name

                  <input style="background-color:{{myCol}}"

                  ng-model="myCol" value="{{myCol}}">

            </p>

      <div ng-init="cost=5; quantity= [1, 15, 19, 2, 40] ;">

            <p>Total in dollar: ${{quantity [2] * cost}} </p>

      </div>

      <div>

        <ul>All Rainbow Colors

          <li ng-repeat="x in colors">

           <div style="background-color :{{ x}}; width: 10%" > {{x}} </div>

          </li>

        </ul>

      </div>

</body>


Output
READ MORE
...