top button
Flag Notify
    Connect to us
      Site Registration

Site Registration

P4 (Perforce) Cheat Sheet

+2 votes
6,593 views

Admin Commands

p4 admin Perform administrative operations on the server
p4 archive Archive obsolete revisions to archive depots
p4 configure Set, unset, or show server configuration variables
p4 dbschema Report information about metadata in the Perforce database
p4 dbstat Display size or simple statistics for a database table
p4 dbverify Perform low-level verification of the database tables
p4 diskspace Display summary of disk space usage on server
p4 export Extract journal or checkpoint records
p4 jobspec Edit the job template
p4 journaldbchecksums Write journal notes with table checkums
p4 license Update or display the license file
p4 lockstat Report lock status of database tables
p4 logappend Append a line to server log file(s)
p4 logparse Display parsed server log records
p4 logrotate Rotate server log file(s)
p4 logschema Display schema information for server log
p4 logstat Report size of journal, error log, and/or audit log files
p4 logtail Display the last block(s) of the error log
p4 monitor Display current running Perforce process information
p4 obliterate Remove files and their history from the depot
p4 ping Test network performance
p4 property Add, delete, or list property values
p4 protect Modify protections in the server namespace
p4 pull Pull journal or file data from master
p4 reload Reload metadata for an unloaded client or label
p4 replicate Poll for journal data and apply to another server
p4 restore Restore archived revisions to their original location
p4 server Create or edit a server specification
p4 serverid Get or set the unique ID associated with a Perforce server
p4 servers Display list of servers
p4 triggers Modify list of pre-submit and form-validating triggers
p4 typemap Modify the file name-to-type mapping table
p4 unload Unload metadata for an unused client or label
p4 verify Verify that the server archives are intact

Client Commands

p4 add Open a new file to add it to the depot
p4 annotate Print file lines along with their revisions
p4 attribute Set per-revision attributes on revisions
p4 branch Create or edit a branch specification
p4 branches Display list of branches
p4 change Create or edit a changelist description
p4 changes Display list of pending and submitted changelists
p4 client Create or edit a client specification and its view
p4 clients Display list of known clients
p4 copy Makes target identical to source by branching, replacing or deleting
p4 counter Display, set, or delete a counter
p4 counters Display list of known counters
p4 cstat Lists the changes not synchronized in the current client
p4 depot Create or edit a depot specification
p4 depots Display list of depots
p4 describe Display a changelist description
p4 diff Display diff of client file with depot file
p4 diff2 Display diff of two depot files
p4 dirs List subdirectories of a given depot directory
p4 edit Open an existing file for edit
p4 filelog List revision history of files
p4 files List files in the depot
p4 fix Mark jobs as being fixed by named changelists
p4 fixes List what changelists fix what job
p4 fstat Dump file info
p4 grep Print lines in files (or revisions of files) that match a pattern
p4 group Change members of a user group
p4 groups List groups of users
p4 have List revisions last synced
p4 help Print this help message
p4 info Print out client/server information
p4 integrate Schedule integration from one file to another
p4 integrated Show integrations that have been submitted
p4 interchanges Lists changes not yet integrated from source to target
p4 istat Shows the stream’s integration status
p4 job Create or edit a job (defect) specification
p4 jobs Display list of jobs
p4 key Display, set, or delete a key/value pair
p4 keys Display list of known keys and their values
p4 label Create or edit a label specification and its view
p4 labels Display list of labels
p4 labelsync Synchronize label with the current client contents
p4 list Create an in-memory (label) list of depot files
p4 lock Lock an opened file against changelist submission
p4 logger Report what jobs and changelists have changed
p4 login Login to Perforce by obtaining a session ticket
p4 logout Logout of Perforce by removing or invalidating a ticket
p4 merge Merge changes from one set of files into another
p4 move Move file(s) from one location to another
p4 opened Display list of files opened for pending changelist
p4 passwd Set user password on server (and Windows client)
p4 populate Branches files to target without requiring a workspace
p4 print Retrieve a depot file to the standard output
p4 protects Display protections in place for a given user/path
p4 reconcile Opens files for edit, add or delete.
p4 rename Explains how to rename files
p4 reopen Change the type or changelist number of an opened file
p4 resolve Merge open files with other revisions or files
p4 resolved Show files that have been merged but not submitted
p4 revert Discard changes from an opened file
p4 review List and track changelists (for the review daemon)
p4 reviews Show what users are subscribed to review files
p4 shelve Store files from a pending changelist, without submitting them
p4 set Set variables in the registry (Windows only)
p4 shelve Store files from a pending changelist into the depot
p4 sizes Display size information for files in the depot
p4 status Reports which files need to be added, opened or deleted.
p4 stream Create or edit a stream specification
p4 streams Display a list of known streams
p4 submit Submit open files to the depot
p4 sync Synchronize the client with its view of the depot
p4 tag Tag files with a label
p4 tickets Display list of session tickets for this user
p4 trust Establish trust of an SSL connection to a Perforce service
p4 unlock Release a locked file but leave it open
p4 unshelve Restore shelved files from a pending change into a workspace
p4 user Create or edit a user specification
p4 users Display list of known users
p4 where Show how file names map through the client view

posted Feb 13, 2014 by Salil Agrawal

  Promote This Article
Facebook Share Button Twitter Share Button LinkedIn Share Button


Related Articles

  • checking out files

    cvs co module
    cvs co -r tag module
    cvs co -D date module

    module: the name of a package or sub-package (e.g. Offline)
    tag: the name of a cvs tag (e.g. v0_0_3)
    date: for example "2014-01-26 01:30"

The date option will select the most recent files with a commit date no later than the date specified as the argument.

  • Comparing your current working files to the version that was checked out.
    cvs diff filename(s)
    cvs diff

    The first version will compare the specified file(s). If any of the filenames are directories, the cvs will recursively descend through the directory and compare all files.
    The second version compares all files in the directory tree rooted at .

  • commit your changes
    cvs commit -m "Comment text goes here." filename(s)
    cvs commit filename(s)

    Both versions will commit the named files to the repository.
    You may use wildcards to specify multuiple files.
    If a filename is a directory, cvs will recursively descend through the directory and commit all modified or added files.
    In the first version the comment is given inline.
    In the second version cvs will open an editor window to allow you to give a longer comment.

  • adding files
    There are separate instructions for adding a directory. Adding a new file is a three step process.

    Create the file(s)
    cvs add filename(s)
    cvs commit -m "Comment" filename(s)

In the add and commit commands, you can use wildcards and/or you may list several files on one line. Be careful with wildcards so that you do not add or commit unintended files. If you accidentally add a file, simply skip the commit for that file.

  • adding directories
    You cannot commit an empty directory. You must create a file in the directory first.

    mkdir directoryname
    cd directoryname
    Create one or more files
    cd ..
    cvs add directoryname
    cvs add directoryname/file1 directoryname/file2 ...
    cvs commit -m "Comment text." directoryname

This will add and commit both the directory and all of the files that you added in step 6.

  • removing files
    rm file(s)
    cvs remove file(s)
    cvs commit -m "Comment text" file(s)

    You must rm the file before issuing the cvs remove command.
    The remove is not final until the commit has been issued.

  • removing directories
    cvs does not let you remove directories. However it does let you ignore any directories that are empty.

    cvs co -P Offline
    cvs update -PdA

    In both cases, the -P option says to prune empty directories.
    If you remove all ordinary files from a directory tree, leaving only subdirectories, then the -P option will skip the full directory tree.

  • updating
    cvs update -PdA

    The options mean:
    P: Prune empty directories
    d: create new directories
    A: Reset sticky tags

This changes only files in your working copy. No changes are made to the respository. If there were no conflicts between changes made in your working copy and changes made in the repository, then cvs update will sync your working copy with changes from the repository. This includes adding new files from the repository, deleting files that were deleted in the repository and changing files that were changed in the repository.

If you want your changes to be put in the repository you still must do a cvs commit. cvs will do this recursively, starting in your current working directory and working down through the directory tree.

  • check the history and the commit comments for a specific file
    cvs log filename

  • some useful history commands
    cvs history -c -a -D "1 day ago" -z CDT
    find all changes submitted to the repository by anyone in the past day

    cvs history -c -a -D "1 day ago" -f Mu2eG4/src -z CDT
    find all changes submitted to Mu2eG4/src (or any other subdirectory) by anyone in the past day

    cvs history -c -u user "1 day ago" -f Mu2eG4/src -z CDT
    find all changes submitted by user to Mu2eG4/src in the past day

    The -z CDT argument tells cvs to print the dates in CDT time ( Central Daylight Time - Fermilab summer time ). You can substitute other time zone abbreviations

  • command line help
    cvs -H command e.g., cvs -H history

  • Tagging

    cvs tag tag [files ...]
    cvs tag -c tag [files ...]
    cvs rtag tag module [module...]

    Here tag is the name of the tag, for example v1_2_3.
    "cvs tag" takes as arguments the names of checked out files whereas "rtag" takes as arguments the names of modules in the repository.

    For cvs tag:
    If a named file is a directory, then cvs tag will work recursively down through that directory.
    If no files are named, then cvs tag will work recursively down from the current working directory.
    Before tagging, make sure that your current working copy is up to date with the respository: the thing that is tagged is the version at the head of the repository, not your working copy. Another way to say this is that tag does not have an implied commit.
    The -c option will check the named files to make sure that all files are up to date with the repository before tagging. If there are any problems, nothing is tagged.
    For cvs rtag:
    The tag is placed on files at the head of repository.

  • Moving tags.
    cvs tag -r revision -F tag [files ...]

where revision is the internal cvs revsion number of the version which is to receive the tag and where tag is the name of the tag to be moved. Never move a tag on code that has been used to create results that are in any way "official"; if it is necessary to bug fix production code, use a branch instead of moving tags.

  • Checking the status of a file.
    cvs status filename

where filename is the name of a checked out file. This command will let you know if the checked out version of the file is in sync with the repository, if the file has been modified since you checked it out or if the repository version of the file has been modified since you checked it out.

  • Other information about a file
    cvs log filename

where filename is the name of a checked out file. This command will print out information about all existing versions of the file, including all of the comments made at commit-time. The printout includes the list of which revision numbers belong in which tag.

READ MORE

In continuation of
http://tech.queryhome.com/51444/gdb-cheat-sheet-part-1
http://tech.queryhome.com/51818/gdb-cheat-sheet-part-2

Variables and memory

Print content of variable/memory/register

gdb> print/format <what>

Print the information after each stepping instruction

gdb> display/format <what>

Enable Display

gdb> enable display <display#>

Disable Display

gdb> disable display <display#>

Print memory

gdb> x/nfu <address>

n: How many units to print (default 1).
f: Format character.
u: Unit - b: Byte,  h: Half-word (two bytes)  w: Word (four bytes)  g: Giant word (eight bytes)

Manipulating the program

Change the content of a variable to the given value.

gdb> set var <variable_name>=<value>
gdb> return <expression>

Code Sources

Add directory to the list of directories that is searched for sources

gdb> directory <directory>

Listing the Code

gdb> list
gdb> list <filename>:<function>
gdb> list <filename>:<line_number>
gdb> list <first>,<last>

Get Informations

gdb> disassemble
gdb> disassemble <where>
gdb> info args
gdb> info breakpoints
gdb> info display
gdb> info locals
gdb> info sharedlibrary
gdb> info signals
gdb> info threads
gdb> show directories
gdb> show listsize
gdb> whatis variable_name
READ MORE

In continuation of http://tech.queryhome.com/51444/gdb-cheat-sheet-part-1

Setting a Watch Point

Set a new watchpoint

gdb> watch <where>

Delete/enable/disable watchpoint

gdb> delete/enable/disable <watchpoint#>

Adding a condition

gdb> break/watch <where> if <condition>

Break/watch at the given location if the condition is met. Conditions may be almost any C expression that evaluate to true or false.

Examining the stack

Show call stack

gdb> backtrace
gdb> where

Show call stack with full frame each frame.

gdb> backtrace full
gdb> where full

Jumping to a stack frame

gdb> frame <frame#>

Stepping in Debug Mode

Go to next instruction (source line)

gdb> step or s

Go to next instruction (source line) but donʻt dive into functions

gdb> next or n

Continue until the current function ends

gdb> finish or fin

Continue normal execution

gdb> continue or c
READ MORE

Basic GDB

Start GDB with Binary

$ gdb <program> <core dump>

Start GDB with core dump

$ gdb <program> <core dump>

Start GDB and pass arguments

$ gdb --args <program> <args…> 

Start GDB and attach to process

$ gdb --pid <pid>

Run the program in in debug mode after above steps

gdb> run [ <args...>]

BreakPoint

Set a new breakpoint

gdb> break <where>

Remove a breakpoint.

gdb> delete <breakpoint#>

Delete all breakpoints

gdb> clear

Disable a breakpoint.

gdb> disable <breakpoint#>

Enable a disabled breakpoint

gdb> enable <breakpoint#>
READ MORE

Create a Repository
To store projects in Subversion, first you must create a repository. This must be done to a local drive on a local machine. Creating a repository on a network drive is not supported. To create a repository type:

UNIX:  svnadmin create /path/to/repository
Windows:  svnadmin create d:/path_to_repository

By default this sets up a Berkeley database to store the repository. Individual projects should be created as subdirectories of the repository directory (the forward slashes are required even on Windows)

Add a New Project - svn import

To add a project, the Subversion documentation suggests that you create a directory structure like the following:
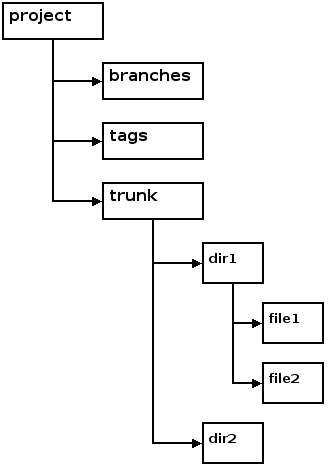
Directory

A root project directory contains three subdirectories, branches, tags, and trunk. Your files and directories are stored under the trunk directory.

Create the directories as described. Assuming the project directory is a subdirectory of the current directory, you would enter the following command

UNIX: svn import project file:///repository_name/project -m "First Import"
Windows: svn import project file:///d:/repository_name/project -m "First Import"
Network:  svn import project http://host_name/svn_dir/repository_name/project -m "First Import"

Commonly Used Commands

1.) Checkout the code

$svn checkout http://192.168.0.54/svn/repos/server_code server_code

If your repository requires authentication:

$svn checkout –username my_username http://192.168.0.54/svn/repos/server_code server_code

Update your working copy:

$svn update
(update from current)
$svn update -r BASE server_code
(update foo from base revision)
$svn update -r 1200 server_code (update foo from revision number 1200)

2.) Make changes:

$svn add eg svn add new_directory
(add a new directory foo)
$svn delete
$svn copy directory1 directory2
(copy directory directory1 to directory2)
$svn move directory2 renamed_directory
(rename?)

3.) Examine your changes (Can be done even with no network access to the subversion repository):

$svn status (To get an overview of all your changes)
$svn diff  (to show changes between current working directory and the same directory in the repository)

4.) Possibly undo some changes

$svn revert
After running svn revert as a way to resolve local conflict with the repository copy, Run:

$svn resolve
To inform svn that the conflict has been resolved. You will now be able to successfully run svn update in case of previous conflicts.

5.) Resolve Conflicts (Merge Others’ Changes):

$svn update
$svn resolved

6.) Commit your changes:

$svn commit
eg
$svn commit -m “Removed out of mem errors.”
or
$svn commit -F comment.txt
or
$svn commit –file comment.txt

6. Logs:

$svn log (use current working directory as the default target)
$svn log server_code
(current working directory/file is server_code)
$svn log -r 5:19
(shows logs 5 through 19 in chronological order of working directory)
$svn log -r 19:5
(shows logs 5 through 19 in reverse order of working directory)
$svn log -r 8
(shows log for revision 8 of working directory)
$svn log -r 8 -v
(shows verbose? log for revision 8 of working directory)

7. Diffs (Changes):

$svn diff
$svn diff -r 3 rules.txt
(or svn diff –revision 3 rules.txt)
$svn diff -r 2:3 rules.txt
(revisions 2 and 3 are directly compared)
$svn diff -c 3 rules.txt
(compare changes between current revision and revision 2)

8. Browse a file directly:

svn cat -r 2 rules.txt
svn cat -r 2 rules.txt > rules.txt.v2 (send cat output directly to a file)

9. Browse a folder directly:

svn list http://svn.collab.net/repos/svn
svn list -v http://svn.collab.net/repos/svn

10. Fetching older repository snapshots:

$svn checkout -r 1729
(Checks out a new working copy at r1729)
$svn update -r 1729
(Updates an existing working copy to r1729)

11. Checkout based on revisions:

$svn checkout -r {2006-02-17}
$svn checkout -r {15:30}
$svn checkout -r {15:30:00.200000}
$svn checkout -r {“2006-02-17 15:30″}
$svn checkout -r {“2006-02-17 15:30 +0230″}
$svn checkout -r {2006-02-17T15:30}
$svn checkout -r {2006-02-17T15:30Z}
$svn checkout -r {2006-02-17T15:30-04:00}
$svn checkout -r {20060217T1530}
$svn checkout -r {20060217T1530Z}
$svn checkout -r {20060217T1530-0500}

12. Logs based on revisions:

$svn log -r {2006-11-28}
$svn log -r {2006-11-20}:{2006-11-29}

13. Locking files:

$svn lock banana.jpg -m “Editing file for tomorrow’s release.”
‘banana.jpg’ locked by user ‘harry’.

14. Creating branches:

$svn checkout http://svn.example.com/repos/calc bigwc
A bigwc/trunk/
A bigwc/trunk/Makefile
A bigwc/trunk/integer.c
A bigwc/trunk/button.c
A bigwc/branches/
Checked out revision 340.

Now create the branch;

$cd bigwc
$svn copy trunk branches/my-calc-branch
$svn status
A + branches/my-calc-branch

$svn commit -m “Creating a private branch of /calc/trunk.”
Adding branches/my-calc-branch
Committed revision 341.
READ MORE
...