ASP.NET MVC makes use of MVC design pattern and the result is far different at code level. ASP.NET MVC divides the entire processing logic into three distinct parts namely model, view and controller. In the process views (that represent UI under MVC architecture) needed to sacrifice three important features of web forms viz. Postbacks, ViewState and rich event model. Let's quickly see why this sacrifice is necessary. Remember that in the following sections when I say "web form" I mean the original web form model and when I say "MVC web page" I mean MVC based web forms, though technically they belong to the same inheritance chain.
- In a web form controls such as Button and LinkButton always submit a form (POST request) to itself. That means under default scheme post backs originating from a web form are handled in the same web form. This contradicts the MVC pattern where a view always talks with a controller and not to itself.
- First thing to note is that server controls were never designed keeping MVC architecture in mind. They were always intended to be used with "forms based" programming mode. The clever tricks played by web form framework and server controls such as ViewState and events though quite useful in "forms based" model they are of a very little use in MVC architecture. Since a view never submits data to itself (rather it sends it to a controller) ViewState has no role to play in MVC architecture.
- Web form events can be either "GET" events or "POST" events. Because of the points mentioned above "POST" events of server controls (such as Click event of a Button, SelectedIndexChanged event of GridView and so on) are of little use in MVC.
Considering the above points MVC doesn't offer any direct equivalent of server controls. Under MVC scheme views make use of raw HTML, non-visual helper classes (HTML helpers) and of course third party controls.
Purely for the sake of rough analogy web forms and MVC web pages can be compared like this - The data objects such as DataSets, entities, generic lists etc. go as model under MVC, the markup that renders some UI (typically .aspx files and .ascx files) goes in views and the code that usually goes in event handlers go in controllers.
If you are thinking that the discussion so far is contradicting with the title of the article wait. Though server controls are not a recommended choice under ASP.NET MVC there are situations where you may need to use server controls. Some of these situations include:
- You are working with server controls for over eight long years. You don't want to dump them immediately just because you wish to use ASP.NET MVC.
- You are migrating existing ASP.NET web forms based website onto ASP.NET MVC. You simply want to re-use your efforts as much as possible.
- Your client has asked you to develop a prototype using ASP.NET MVC. You want to do it quickly. Your team is not yet fully acclimatized with ASP.NET MVC.
- You want to familiarize yourself with MVC concepts first rather than focusing too much on raw HTML and HTML helpers. Over a period of time you plan to master those pieces.
- You are still evaluating third party MVC controls / helpers. Unless you are convinced that a vendor is meeting your expectations you want to continue using existing controls.
Merely using server controls on an MVC web pages doesn't break MVC architecture in any way. Improper use of the server controls, however, can break the architecture and make your views difficult to understand. When you wish to use server controls in ASP.NET MVC you should keep in mind the following points:
- Server controls should always post data to a controller. You can use PostbackUrl property of Button and LinkButton controls to achieve this.
- Server controls and the web forms should never use ViewState. The view will get its data from ViewData collection and send its data to a controller via POST request.
- MVC web pages can make use of "GET" events (Page_Load for example) if required but they should never make use of "POST" events (SelectedIndexChanged event of GridView for example).
Example Scenario
To illustrate how we can use ASP.NET server controls in ASP.NET MVC web pages we will develop a sample application. In this application we will make use of GridView and DetailsView control. The application adds, edits, deletes and selects records from Employees table. Later we will also add sorting and paging capabilities to our grid.
Just to give you an idea of what we will be building see the following screen shots:
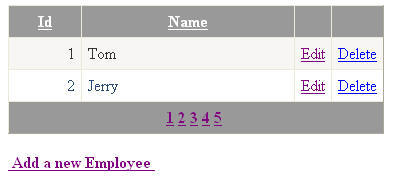
Figure 1
We present a list of existing employees to the user. Clicking on "Add a new Employees" link takes you to another page where a new employee record can be added.
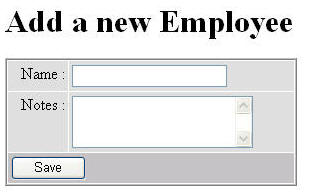
Figure 2
Clicking on Edit will take the user to a data entry page where the selected employee record can be edited.
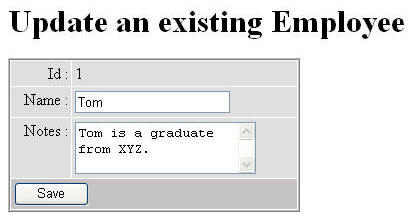
Figure 3
Notice that edit and add pages make use of DetailsView control and the listing page makes use of GridView control.
Create an MVC Web Application
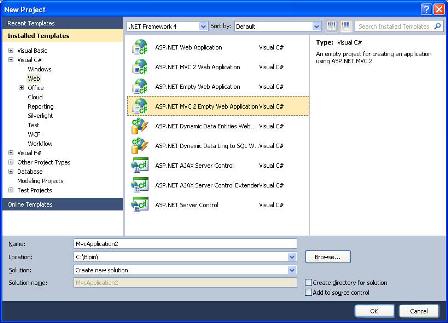
Begin by creating a new MVC Web Application in Visual Studio. Select ASP.NET MVC 2 Empty Web Application template as shown below:
Creating a Model
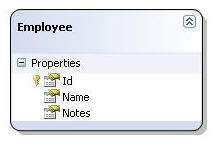
Add a new SQL Server database to the App_Data folder and create a table named Employees. The Employees table contains three columns viz. Id, Name and Notes. Id is an identity column. Add a few sample records in the Employee table for testing purpose.

Then add a new LINQ to SQL Classes (.dbml) file to Models folder. Drag and drop Employees table onto its design surface from the Server Explorer. Doing so will create a LINQ to SQL class (Employee) for Employees table. This class will form the model for our MVC pages.
Creating a Controller
Now add a new class named EmployeeController in the Controllers folder. The EmployeeController class will have the following action methods:
- Index : Fetches all the records from Employees table and renders Index view.
- ShowInsertView : Shows insert view with a DetailsView control in insert mode.
- Insert : Picks up data submitted by insert view and insert it into the Employees table.
- ShowUpdateView : Shows update view with a DetailsView control in edit mode.
- Update : Picks up data submitted by update view and saves it into the Employees table.
- Delete : Deletes a record from Employees table.
These action methods are discussed next.
public ActionResult Index()
{
    DataClasses1DataContext db = new DataClasses1DataContext();
    IQueryable<Employee> emplist = from rows in db.Employees
                                   select rows;
    ViewData["emplist"] = emplist;
    return View();
}
The Index() action method creates an instance of data context class and then executes a LINQ query to fetch all the rows from Employees table. The returned rows are stored in a ViewData collection so that they can be accessed in the view. Index view is then rendered.
public ActionResult ShowInsertView()
{
    return View();
}

[HttpPost]
public ActionResult Insert(FormCollection collection)
{
    DataClasses1DataContext db = new DataClasses1DataContext();
    Employee item = new Employee();
    item.Name = collection["DetailsView1$txtName"];
    item.Notes = collection["DetailsView1$txtNotes"];
    db.Employees.InsertOnSubmit(item);
    db.SubmitChanges();
    return RedirectToAction("Index");
}
The ShowInsertView() action method simply renders ShowInsertView view. Since we are inserting a new record no data needs to be passed to the view.
Notice the Insert() action method carefully. It is marked with [HttpPost] attribute indicating that only POST requests can invoke this action method. The Insert() method receives the form data as a FormCollection parameter. FormCollection parameter is essentially a key-value collection. See how we retrieve the values entered in the DetailsView control of the view. The DetailsView control will have two textboxes with IDs txtName and txtNotes respectively. As you are probably aware, SP.NET automatically prefixes the IDs of the constituent controls with the parent control ID. So txtName becomes DetailsView1$txtName when the view data is posted. A new Employee object is constructed and inserted in the Employees table. The index view is again rendered so that the user goes back to the employee listing.
public ActionResult ShowUpdateView(int id)
{
    DataClasses1DataContext db=new DataClasses1DataContext();
    var temp = from item in db.Employees
                where item.Id == id
                select item;
    ViewData["emplist"] = temp.ToList();
    return View();
}

[HttpPost]
public ActionResult Update(int id,FormCollection collection)
{
    DataClasses1DataContext db = new DataClasses1DataContext();
    var temp = from item in db.Employees
                where item.Id == id
                select item;
    temp.First().Name=collection["DetailsView1$txtName"];
    temp.First().Notes = collection["DetailsView1$txtNotes"];
    db.SubmitChanges();
    return RedirectToAction("Index");
}
The ShowUpdateView() action method fetches an Employee record whose ID matches with the supplied ID. The ShowUpdateView() method receives an ID from employee listing page (see the first figure). The Employee collection is stored in a ViewData variable and ShowUpdateView view is rendered. Even though the LINQ query is returning a single object we still need to pass it as a generic List beause DetailsView control expects a list or array for the sake of data binding.
The Update() action method is similar to Insert() method we discussed earlier. The only difference is that it modifies an existing record instead of adding a new one. The Id of the employee to be updated is supplied as Id parameter from the view (see the first figure). After the update operation the user is again taken to the employee listing.
public ActionResult Delete(int id)
{
    DataClasses1DataContext db = new DataClasses1DataContext();
    var temp = from item in db.Employees
                where item.Id == id
                select item;
    db.Employees.DeleteOnSubmit(temp.First());
    db.SubmitChanges();
    return RedirectToAction("Index");
}
The Delete() action method simply deletes a specified employee from the Employees table and takes the user back to the employee listing. Notice that unlike Insert() and Update() action methods Delete() method is not marked with [HttpPost] attribute because we are not posting anything to it. The Id parameter will be supplied from the Index view as a part of GET request.
Creating Views
In all we need to create three views viz. Index, ShowInsertView and ShowUpdateView. These views can be seen in the figures shown above.
To create the Index view, add a new View in the Views folder. Drag and drop a GridView control on the view design surface. Add two TemplateField columns and two HyperLink columns to the GridView and configure them as follows:
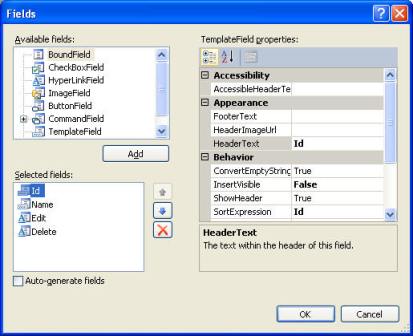
The Id and Name template fields are bound with Id and Name columns of the Employees table. The markup after binding the Id template field is shown below.
<asp:TemplateField HeaderText="Id" InsertVisible="False"
     SortExpression="Id">
    <ItemTemplate>
        <asp:Label ID="Label1" runat="server"
        Text='<%# Bind("Id") %>'></asp:Label>
    </ItemTemplate>
</asp:TemplateField>
The Edit and Delete HyperLink columns essentially display a hyperlink that points to the ShowUpdateView and Delete action methods respectively.
<asp:HyperLinkField DataNavigateUrlFields="Id"
    DataNavigateUrlFormatString="~/Employee/ShowUpdateView/{0}"
    Text="Edit" >
</asp:HyperLinkField>
<asp:HyperLinkField DataNavigateUrlFields="Id"
    DataNavigateUrlFormatString="~/Employee/Delete/{0}"
    Text="Delete" >
</asp:HyperLinkField>
Notice how the DataNavigateUrlField and DataNavigateUrlFormatString properties are used. At run time in place of {0} the employee Id for that row will be substituted. Recollect that the ShowUpdateView() and Delete() actions methods accept employee Id as a parameter.
Now place a HyperLink control below the GridView we just configured. Set its Text and NavigateUrl properties to "Add a new Employee" and ~/Employee/ShowInsertView respectively.
Final task is to bind the GridView with the data we pass through ViewData variable. We do this in the Page_Load event as shown below:
protected void Page_Load(object sender, EventArgs e)
{
    GridView1.DataSource = ViewData["emplist"];
    GridView1.DataBind();
}
This complete the Index view. We will revisit Index view when we implement sorting and paging features to the GridView in Part 2 of this article.
Now add another view in the Views folder and name it as ShowInsertView.aspx. Drag and drop a DetailsView control on it and set its DefaultMode property to Insert. This way when the view is rendered the DetailsView will be ready to accept a new entry. The DetailsView will have two template fields for Name and Notes columns respectively (though we won't bind them with anything as such). Since employee ID is identity column we need not include it in the DetailsView. Design the InsertItemTemplate of both the template fields to include textboxes. Then add a Button control to the footer template of the DetailsView and set its Text and PostbackUrl properties to Save and ~/Employee/Insert respectively. This way clicking the Save button will post the form to Insert() action method we coded earlier. Your DetailsView should resemble Figure 2. The markup of DetailsView is given below:
<asp:DetailsView ID="DetailsView1" runat="server" DefaultMode="Insert">
 <Fields>
     <asp:TemplateField HeaderText="Name :">
         <InsertItemTemplate>
           <asp:TextBox ID="txtName" runat="server"
             Text='<%# Bind("Name") %>' />
         </InsertItemTemplate>
     </asp:TemplateField>
     <asp:TemplateField HeaderText="Notes :">
        <InsertItemTemplate>
           <asp:TextBox ID="txtNotes" runat="server"
             Text='<%# Bind("Notes") %>' Rows="3"
             TextMode="MultiLine"></asp:TextBox>
        </InsertItemTemplate>
    </asp:TemplateField>
    </Fields>
    <FooterTemplate>
     <asp:Button ID="Button1" runat="server"
       PostBackUrl="~/Employee/Insert"
       Text="Save" Width="75px" />
    </FooterTemplate>
</asp:DetailsView>
Similarly, add a view named ShowUpdateView.aspx and design its DetailsView as shown in Figure 3. This time the DefaultMode property of the DetailsView should be set to Edit. The DetailsView EditItemTemplate has three template fields viz. Id, Name and Notes. The Id column is not editable. The markup of the DetailsView is given below:
<asp:DetailsView ID="DetailsView1" runat="server" DefaultMode="Edit">
    <Fields>
        <asp:TemplateField HeaderText="Id :">
            <EditItemTemplate>
                <asp:Label ID="Label1" runat="server"
                 Text='<%# Bind("Id") %>'></asp:Label>
            </EditItemTemplate>
        </asp:TemplateField>
        <asp:TemplateField HeaderText="Name :">
            <EditItemTemplate>
                <asp:TextBox ID="txtName" runat="server"
                  Text='<%# Bind("Name") %>'></asp:TextBox>
            </EditItemTemplate>
        </asp:TemplateField>
        <asp:TemplateField HeaderText="Notes :">
            <EditItemTemplate>
                <asp:TextBox ID="txtNotes" runat="server"
                  Text='<%# Bind("Notes") %>' Rows="3"
                  TextMode="MultiLine"></asp:TextBox>
            </EditItemTemplate>
        </asp:TemplateField>
    </Fields>
    <FooterTemplate>
        <asp:Button ID="Button1" runat="server"
            PostBackUrl='<%# Eval("Id","~/Employee/Update/{0}") %>'
            Text="Save" Width="75px" />
    </FooterTemplate>
</asp:DetailsView>
Notice the PostbackUrl property of the Save button carefully. It is set to ~/Employee/Update/{0}. The Update() action needs employee Id as a parameter. The employee Id is passed via Id property of the model. The DetailsView is finally bound with the model in the Page_Load event as shown below:
protected void Page_Load(object sender, EventArgs e)
{
    object emplist = ViewData["emplist"];
    DetailsView1.DataSource = emplist;
    DetailsView1.DataBind();
}
Recollect that we are saving employee object to be edited in a ViewData variable in the ShowUpdateView() action method. The same object is bound with the DetailsView.
That's it! Run the web application and navigate to Index view (your URL should be something like http://localhost:XXXX/Employee/index where XXXX is the port number assigned by development web server). Try adding new employee entries as well as edit existing records.
Disabling ViewState completely
Though our application is functioning as expected, it has one flaw. The individual views still maintain ViewState of server controls (GridView, DetailsView etc.). In MVC applications the ViewState is of little use and if not disabled unnecessarily makes the view heavier. One quick way to rectify the problem is to set EnableViewState property of the page to false. This way the ViewState will be reduced to a small value.
<input type="hidden" name="__VIEWSTATE" id="__VIEWSTATE"
value="Ly91biiCAQJThIvtDDyFLvl0HWiJ1O/Egm9fLkQEf72LVCkYT/EI
C88uk3xc+Ku3pXDLM6jhDLA7sY6nOh5Hj1Fg93VSiGZHl5/T5O4U69A=" />
Though we have disabled the ViewState using EnableViewState property the control state is still maintained and cannot be disabled as such. If you wish to get rid of this small chunk of ViewState also then add the following overridden methods in the view page server side code.
protected override void SavePageStateToPersistenceMedium(object state)
{
}

protected override object LoadPageStateFromPersistenceMedium()
{
 return null;
}
The SavePageStateToPersistenceMedium() is intended t save ViewState and ControlState information of the page. We override it with an empty implementation so that no ViewState or ControlState is saved. The LoadPageStateFromPersistenceMedium() simply returns null. This way the ViewState hidden field becomes:
<input type="hidden" name="__VIEWSTATE"
id="__VIEWSTATE"
value="" />


