top button
Flag Notify
    Connect to us
      Site Registration

Site Registration

Your First MVC 6 And EF 7 Application (Form Using Tag Helpers) : Part 2

+5 votes
479 views

In Part 1 of this series you created and configured a basic project using ASP.NET MVC 6. Although the project runs as expected and outputs a message in the browser, it isn't database driven yet. In this part we will add database support to the project in the following ways:

  • Display a list of customers from the Northwind database
  • Allow for modification of existing customers
  • Provide basic validation capabilities

In this part we will modify the Index view to look like this:

image

As you can see, the page displays a list of customers from the Customers table of the Northwind database. Each table row has an Edit link. Clicking on the Edit link takes you to the Edit view so that the customer details can be modified. (see below).

image

Once you modify the details and click on the Save button the modified details are saved in the database. In case there are any validation errors they are displayed on the page like this:

image

Ok. Let's begin our development!

Open the same project that we created in Part 1 and add Customer class to the Models folder using the Add New Items dialog. The complete code of this class is shown below:

[Table("Customers")]
public class Customer
{
    [Required]
    [StringLength(5)]
    public string CustomerID { get; set; }
    [Required]
    public string CompanyName { get; set; }
    [Required]
    public string ContactName { get; set; }
    [Required]
    public string Country { get; set; }
}

The Customer class is mapped to the Customers table using the [Table] attribute and contains four public properties namely CustomerID, CompanyName, ContactName and Country. Basic validations such as [Required] and [StringLength] are also added to these properties.

Then add NorthwindDbContext class to the Classes folder and write the following code to it.

public class NorthwindDbContext:DbContext
{
    public DbSet<Customer> Customers { get; set; }

    protected override void OnConfiguring
      (DbContextOptionsBuilder optionsBuilder)
    {
        optionsBuilder.UseSqlServer(AppSettings.ConnectionString);
    }
}

The NorthwindDbContext class represents our data context and hence inherits from the DbContext base class. It consists of a single DbSet - Customers. Notice how the OnConfiguring() method has been overridden to specify the database connection string.

The overridden OnConfiguring() method supplies optionsBuilder parameter. The UseSqlServer() method accepts a database connection string. Recollect that we have stored the database connection string in the ConnectionString static property of the AppSettings class during startup of the application.

Now modify the Index() action of the HomeController as shown below:

public IActionResult Index()
{
    using (NorthwindDbContext db = new NorthwindDbContext())
    {
        List<Customer> data = db.Customers.ToList();
        return View(data);
    }
}

The Index() action simply instantiates the NorthwindDbContext and fetches all the customers in the form of a List. This List is supplied to the Index view as its model.

Now, open the Index view and modify it as shown below:

@model List<MVC6Demo.Models.Customer>

<html>
<head>
    <title>My First MVC 6 Application</title>
</head>
<body>
    <h1>List of Customers</h1>
    <table border="1" cellpadding="10">
        @foreach (var item in Model)
        {
            <tr>
                <td>@item.CustomerID</td>
                <td>@item.CompanyName</td>
                <td><a asp-action="Edit" 
                     asp-controller="Home" 
                     asp-route-id="@item.CustomerID">
                    Edit</a></td>
            </tr>
        }
    </table>
</body>
</html>

The Index view displays a list of customers in a table. This code is quite similar to MVC 5.x except the Edit link. In MVC 5.x you use ActionLink() HTML helper to render hyperlinks. The above code uses an anchor Tag Helper to achieve the same. The asp-action and asp-controller attributes points to the action method and the controller. The asp-route-id attribute specifies the ID route parameter to a CustomerID. This way the Edit links will take this form:

/home/edit/ALFKI

To get the Tag Helper intellisense you need to add _ViewImports.cshtml file to the Views folder (you can do that using Add New Items dialog). Once added place the following code in it:

@addTagHelper "*, Microsoft.AspNet.Mvc.TagHelpers"

The @addTagHelper directive tells the framework to use Tag Helpers from the specified assembly. You will now get various tag helper related attributes in the Visual Studio intellisense.

Ok. Next, add Edit() action to the HomeController as shown below:

public IActionResult Edit(string id)
{
    using (NorthwindDbContext db = new NorthwindDbContext())
    {
        Customer data = db.Customers.Where(i => 
                 i.CustomerID == id).SingleOrDefault();
        var query = (from c in db.Customers
                        orderby c.Country ascending
                        select new SelectListItem() 
                    { Text = c.Country, Value = c.Country })
                    .Distinct();
        List<SelectListItem> countries = query.ToList();
        ViewBag.Countries = countries;
        return View(data);
    }
}

The Edit action receives a CustomerID as its parameter. Inside, the code fetches a Customer matching the supplied ID and passes it to the Edit view. The Edit view also needs a list of countries for the Country column. So, a List of SelectListItem (Microsoft.AspNet.Mvc.Rendering namespace) is created and filled with unique countries from the Customers table. This List is passed to the view through the Countries ViewBag property.

Then add Edit view under Views/Home folder and key-in the following markup in it:

@model MVC6Demo.Models.Customer

<html>
<head>
    <title>My First MVC 6 Application</title>
    <style>
        .field-validation-error
        {
            color:red;
        }
        .validation-summary-errors
        {
            color:red;
        }
    </style>
</head>
<body>
<h1>Edit Customer</h1>
<form asp-controller="Home" asp-action="Save" method="post">
<table border="1" cellpadding="10">
<tr>
<td>
<label asp-for="CustomerID">Customer ID :</label>
</td>
<td>
<input asp-for="CustomerID" readonly="readonly" />
<span asp-validation-for="CustomerID"></span>
</td>
</tr>
<tr>
<td>
<label asp-for="CompanyName">Company Name :</label>
</td>
<td>
<input asp-for="CompanyName" />
<span asp-validation-for="CompanyName"></span>
</td>
</tr>
<tr>
<td>
<label asp-for="ContactName">Contact Name :</label>
</td>
<td>
<input asp-for="ContactName" />
<span asp-validation-for="ContactName"></span>
</td>
</tr>
<tr>
<td>
<label asp-for="Country">Country :</label>
</td>
<td>
<select asp-for="Country" 
asp-items="@ViewBag.Countries"></select>
<span asp-validation-for="Country"></span>
</td>
</tr>
<tr>
<td colspan="2">
<input type="submit" value="Save" />
</td>
</tr>
</table>
</form>
<div asp-validation-summary="ValidationSummary.All"></div>
<br />
<a asp-action="Index" asp-controller="Home">Go Back</a>
</body>
</html>

The above markup uses the following Tag Helpers:

  • form
  • label
  • input
  • select
  • field validation and validation summary

The asp-action and asp-controller attributes of the form tag helper are set to Save and Home respectively. This way the form will be POSTed to the Save() action of the HomeController. The asp-for attribute of the label and the input tag helpers specify a model property that is bound with the label and the input field respectively. The asp-items attribute of the select tag helper specify that the <option> elements be generated from the Countries ViewBag property.

The field level validations are displayed by adding <span> elements and setting their asp-validation-for attribute to the appropriate model property. This way the model validation errors will be displayed in the <span> elements. The validation summary is displayed in a <div> element by setting its asp-validation-summary attribute to ValidationSummary.All. The look and feel of the validation tag helpers is controlled through CSS classes - .field-validation-error and .validation-summary-errors (see top of the markup).

Now add Save() action to the HomeController and write the following code to it:

public IActionResult Save(Customer obj)
{
    using (NorthwindDbContext db = 
                  new NorthwindDbContext())
    {
        var query = (from c in db.Customers
                        orderby c.Country ascending
                        select new SelectListItem() 
         { Text = c.Country, Value = c.Country }).Distinct();
        List<SelectListItem> countries = query.ToList();
        ViewBag.Countries = countries;

        if (ModelState.IsValid)
        {
            db.Entry(obj).State = EntityState.Modified;
            db.SaveChanges();
        }
        return View("Edit", obj);
    }
}

The code that fills the Countries ViewBag property is same as before. Then the code checks whether the ModelState is valid using the IsValid property. If the model state is valid the modified Customer details are saved to the database. This is done by setting the State property to Modified and then calling SaveChanges() method.

That's it! Run the application and check if the customer details can be modified successfully.

In this part you instantiated NorthwindDbContext locally. In the next part we will use MVC 6 dependency injection to inject it into the HomeController. Till then keep coding!

posted Oct 12, 2016 by Shivaranjini

  Promote This Article
Facebook Share Button Twitter Share Button LinkedIn Share Button


Related Articles

If you are tracking the progress of ASP.NET 5, you are probably aware that RC 1 of ASP.NET 5 is now available. Although MVC 5.x is not going away anytime soon, it's good time to get a feel of how MVC 6 application development is going to be. To that end this article explains how a simple MVC 6 application can be developed from ground up using an Empty Project Template. This article is based on the following software:

  • Visual Studio 2015
  • ASP.NET 5 RC 1
  • Entity Framework 7 RC 1

So, make sure you have them installed correctly before you proceed any further.

Let's begin!

Open Visual Studio 2015 and select File > New > Project menu option. In the New Project dialog select ASP.NET Web Application, give some project name and click OK button.

image

In the project template dialog, select Empty under ASP.NET 5 Preview Templates section.

image

The newly created project looks like this in the Solution Explorer:

image

Now, open Project.json file in the Visual Studio editor. The Project.json file is a JSON file and contains all the project configuration such as project dependencies, target frameworks and more. For this example, you need to add certain NuGet packages required to develop and run the application. You can add project dependencies in two ways:

  • Right click on the References node and select Manage NuGet Packages. This is quite similar to MVC 5.x projects. Once added the NuGet package entries are automatically added to the Project.json file.
  • Add NuGet package dependencies directly in the Project.json file.

Let's use the later approach. Modify the dependencies section of Project.json as shown below:

image

Add the project dependencies as shown above and save the Project.json file. At this point Visual Studio automatically installs the dependencies (downloading from NuGet, if necessary) for you. Look for the message like this that confirms this process:

image

We won't go into the details of each and every package in this article. It is suffice to mention that:

  • Microsoft.AspNet.Mvc is the core MVC 6 package
  • Microsoft.AspNet.Mvc.TagHelpers contains tag helpers (discussed later)
  • EntityFramework.MicrosoftSqlServer provides Entity Framework 7 support

Next, right click on the project and select Add > New Item to open the Add New Item dialog.

image

Select ASP.NET Configuration File from the list, name it AppSettings.json and click on Add to add the file to project root folder.

The AppSettings.json file contains all the application specific configuration (no more web.config). Remember the difference between Project.json and AppSettings.json. The former file stores project configuration that is necessary to compile and run the project. The later stores application configuration utilized in the code (connection strings, application settings and so on).

Change the default JSON markup from AppSettings.json to the following:

image

As you might have guessed, we stored database connection string for the Northwind database under Data:DefaultConnection:ConnectionString key.

Now add four folders under the project root namely Models, Views, Controllers and Classes. The purpose of the first three folders is quite obvious. The Classes folder will be used for storing other classes needed in the application such as a DbContext class. You are free to give any other name to this folder (or you may even isolate them in a Class Library).

Then add a class called AppSettings in the Classes folder and write the following code in it:

public class AppSettings
{
    public static string ConnectionString { get; set; }
}

The AppSettings class contains a single static property - ConnectionString - that is intended to hold the database connection string. This property is assigned from the Startup class as discussed shortly. Once assigned you can access the database connection string from anywhere in the application.

Now open Startup.cs file. The code from the Startup class is invoked whenever the application runs. You will find that the Startup class consists of two methods - ConfigureServices() and Configure(). Both of them have special meaning to the framework and hence their name must be kept unchanged.

Modify the Startup file to include a few namespaces and a public constructor.

...
...
using Microsoft.AspNet.Hosting;
using Microsoft.Dnx.Runtime;
using Microsoft.Extensions.Configuration;
using Microsoft.Extensions.PlatformAbstractions;
using Microsoft.Data.Entity;
using MVC6Demo.Classes;

namespace WebApplication1
{
    public class Startup
    {
        public Startup(IHostingEnvironment env,
               IApplicationEnvironment app)
        {
        }

        public void ConfigureServices(IServiceCollection services)
        {
        }

        public void Configure(IApplicationBuilder app)
        {
        }
    }
}

Notice the namespaces at the top. They are required by the code that you will fill in these methods shortly. Also notice that the constructor accepts two parameters - IHostingEnvironment and IApplicationEnvironment. These three methods are executed by the framework in the same order - Startup(), ConfigureServices() and Configure().

Next, add the following code to the Startup() constructor.

public Startup(IHostingEnvironment env,
               IApplicationEnvironment app)
{
    ConfigurationBuilder builder = new ConfigurationBuilder();
    builder.SetBasePath(app.ApplicationBasePath);
    builder.AddJsonFile("appsettings.json");
    IConfigurationRoot config = builder.Build();
    AppSettings.ConnectionString = config.Get<string>
           ("Data:DefaultConnection:ConnectionString");
}

The Startup constructor basically reads the AppSettings.json file and stores the database connection string into the AppSettings class. The ConfigurationBuilder class is responsible for reading and loading the configuration information. The SetBasePath() method sets the base path where the configuration file(s) is located. The ApplicationBasePath means the physical path of the project's root folder.

The AddJsonFile() adds AppSettings.json file to the list of configuration files to be processed. You can have multiple configuration files per project. The Build() method reads the configuration and returns it as an instance of IConfigurationRoot.

To read the configuration settings, you can use Get<T>() method on the IConfigurationRoot object. Notice how the setting to be read is specified using the : notation. Now the database connection string can be accessed from anywhere in the application in typed manner (and without reloading the config files).

Then modify the ConfigureServices() method as shown below:

public void ConfigureServices(IServiceCollection services)
{
    services.AddMvc();
    services.AddEntityFramework().AddSqlServer();
}

The ConfigureServices() method specifies the features that are available to your application. In this case your application is made available the services of the MVC framework and the Entity Framework.

Now modify the Configure() method as shown below:

public void Configure(IApplicationBuilder app)
{
    app.UseStaticFiles();
    app.UseMvc(routes =>
    {
        routes.MapRoute(
            name: "default",
            template: "{controller=Home}/{action=Index}/{id?}");
    });
}

The Configure() method tells the framework that you want to use static files feature and MVC features. The static files feature allows you to access static files such as .htm and .html. If you don't specify this feature and attempt to access the static files you will get an error. Of course, if you don't need this feature you can skip this line.

The UseMvc() call is important because it not only tells the framework that your application is using MVC but also configures the routing system.

 Ok. Now add HomeController to the Controllers folder using the Add New Item dialog. The default HomeController looks like this:

public class HomeController : Controller
{
    public IActionResult Index()
    {
        ViewBag.Message = "Hello from MVC 6!";
        return View();
    }
}

Notice that the Index() action returns IActionResult. The Index() action is quite straightforward and simply sets Message property on the ViewBag.

Then add Home subfolder under Views folder. Right click on the Home folder and open the Add New Item dialog again to add Index view to the project.

Add the following HTML markup to the Index view.

<html>
<head>
    <title>My First MVC 6 Application</title>
</head>
<body>
    <h1>@ViewBag.Message</h1>
</body>
</html>

The Index view simply outputs the Message ViewBag property on the response stream.

Run the application by pressing F5. Your browser should look like this:

image

Although our application is working as expected we didn't use AppSettings class and Entity Framework features. The second part of this article discusses those details. Till then keep coding!

READ MORE

In Part 1 and Part 2 of this series you developed a simple database driven application that displays a list of customers and also allows you to modify the customer details. Although the application is working as expected, it relies on the local instances of the NorthwindDbContext to get its job done. In this article we will use the Dependency Injection (DI) features of MVC 6 to inject the NorthwindDbContext into the controller class. Later we will also add repository support in the application.

Let's begin!

Open the same project in the Visual Studio and also open the Startup class in the IDE. Modify the ConfigureServices() method of the Startup class as shown below:

public void ConfigureServices(IServiceCollection services)
{
    services.AddMvc();
    services.AddEntityFramework()
            .AddSqlServer()
            .AddDbContext<NorthwindDbContext>
             (options => options.UseSqlServer
             (AppSettings.ConnectionString));
}

Notice the code marked in bold letters. We have chained the AddDbContext() method at the end of t he AddSqlServer() method call. The AddDbContext() is a generic method that allows you to specify the type of the DbContext that you wish to inject into the controllers. Moreover, you can also specify the database connection string while adding the DbContext. In this case the AppSettings.ConnectionString property holds the database connection string and is passed to the UseSqlServer() method.

Now open the NorthwindDbContext class and remove the OnConfiguring() overridden method completely.

public class NorthwindDbContext:DbContext
{
    public DbSet<Customer> Customers { get; set; }
    
    // no more OnConfiguring() method
}

We do this because connection string is now being supplied from the ConfigureServices() method.

Finally, open the HomeController and add a public constructor to it as shown below:

public class HomeController : Controller
{
    private NorthwindDbContext db;
    private CustomerRepository repository;

    public HomeController(NorthwindDbContext context)
    {
        this.db = context;
        this.repository = repository;
    }
...
...
}

The HomeController class declares a NorthwindDbContext variable at the top. This variable is assigned in the constructor. The constructor takes a parameter of type NorthwindDbContext. This parameter will be supplied by the DI framework of MVC 6. Once received we store its reference in the db variable for further use.

We need to modify the actions to use this class level variable instead of locally instantiating a DbContext. So, we need remove the using blocks from the existing code. The modified actions are shown below:

public IActionResult Index()
{
    List<Customer> data = db.Customers.ToList();
    return View(data);
}

public IActionResult Edit(string id)
{
    Customer data = db.Customers.Where(i => 
                    i.CustomerID == id).SingleOrDefault();
    var query = (from c in db.Customers
                    orderby c.Country ascending
                    select new SelectListItem() 
                    { Text = c.Country, Value 
                      = c.Country }).Distinct();
    List<SelectListItem> countries = query.ToList();
    ViewBag.Countries = countries;
    return View(data);
}

public IActionResult Save(Customer obj)
{
    var query = (from c in db.Customers
                    orderby c.Country ascending
                    select new SelectListItem() 
                    { Text = c.Country, Value = 
                      c.Country }).Distinct();
    List<SelectListItem> countries = query.ToList();
    ViewBag.Countries = countries;

    if (ModelState.IsValid)
    {
        db.Entry(obj).State = EntityState.Modified;
        db.SaveChanges();
    }
    return View("Edit", obj);
}

Run the application by setting a break point in the constructor. You will find that the DI framework supplies an instance of NorthwindDbContext configured to use the specified connection string.

So far so good. Now let's go ahead and use a repository for the database operations.

To do so, add CustomerRepository class in the Classes folder and write five methods - SelectAll(), SelectByID(), Insert(), Update() and Delete() - in it as shown below:

public class CustomerRepository
{
    public NorthwindDbContext Context {get; private set;}
    public CustomerRepository(NorthwindDbContext context)
    {
        this.Context = context;
    }

    public List<Customer> SelectAll()
    {
        return Context.Customers.ToList();
    }

    public Customer SelectByID(string id)
    {
        return Context.Customers.Where(i => 
               i.CustomerID == id).SingleOrDefault();
    }

    public void Insert(Customer obj)
    {
        Context.Entry(obj).State = EntityState.Added;
        Context.SaveChanges();
    }

    public void Update(Customer obj)
    {
        Context.Entry(obj).State = EntityState.Modified;
        Context.SaveChanges();
    }

    public void Delete(string id)
    {
        Customer obj = Context.Customers.Where(i => 
                   i.CustomerID == id).SingleOrDefault();
        Context.Entry(obj).State = EntityState.Deleted;
        Context.SaveChanges();
    }
}

The CustomerRepository class encapsulates all the logic to perform CRUD operations on the Customers table. Notice that the CustomerRepository doesn't create any local instance of NorthwindDbContext class. It receives it through the constructor. We do this because we want the DI framework to inject the DbContext in the repository just as it did for the controller. The received instance is stored in a public Context property. The Context property has private setter so that the DbContext can't be assigned from outside, at the same time allowing access to the DI supplied instance.

Once the CustomerRepository is ready you need to register it with the DI framework. This can be done as follows:

public void ConfigureServices(IServiceCollection services)
{
    services.AddMvc();
    services.AddEntityFramework()
            .AddSqlServer()
            .AddDbContext<NorthwindDbContext>
             (options => options.UseSqlServer
             (AppSettings.ConnectionString));
    services.AddScoped<CustomerRepository>();
}

Notice the code marked in bold letters. It uses the AddScoped() generic method to register CustomerRepository class with the DI framework. The AddScope() creates an object instance whose scope is the current request. So, now CustomerRepository can also be injected into the controller class.

Although the above class doesn't do that, you can create a repository interface and then implement that interface on the repository class. If your repository is based on some interface you can also specify the interface in the AddScoped() generic method. For example:

services.AddScoped<ICustomerRepository, CustomerRepository>();

The following code shows how the injected repository instance can be used.

public class HomeController : Controller
{
    private CustomerRepository repository;

    public HomeController(CustomerRepository repository)
    {
        this.repository = repository;
    }
...
...
}

This code should look familiar to you because you used it while injecting the NorthwindDbContext. In this case, however, you declare a variable of type CustomerRepository and assign it in the constructor.

Once injected you can use the CustomerRepository in all the actions instead of using the DbContext directly. The following code shows the modified actions of the HomeController.

public IActionResult Index()
{
    List<Customer> data = repository.SelectAll();
    return View(data);
}

public IActionResult Edit(string id)
{
    Customer data = repository.SelectByID(id);
    var query = (from c in repository.Context.Customers
                    orderby c.Country ascending
                    select new SelectListItem()
                    { Text = c.Country, Value = c.Country })
                    .Distinct();
    List<SelectListItem> countries = query.ToList();
    ViewBag.Countries = countries;
    return View(data);
}

public IActionResult Save(Customer obj)
{
    var query = (from c in repository.Context.Customers
                    orderby c.Country ascending
                    select new SelectListItem()
                    { Text = c.Country, Value = c.Country })
                    .Distinct();
    List<SelectListItem> countries = query.ToList();
    ViewBag.Countries = countries;

    if (ModelState.IsValid)
    {
        repository.Update(obj);
    }
    return View("Edit", obj);
} 

For the sake of simplicity the above code creates List of SelectListItem objects by writing a query using the Context property. You could have added some method in the repository that returned the desired countries. Run the application again. If all goes well, you should be able to see the customer list and will be able to modify the customer details.

READ MORE

ASP.NET MVC makes use of MVC design pattern and the result is far different at code level. ASP.NET MVC divides the entire processing logic into three distinct parts namely model, view and controller. In the process views (that represent UI under MVC architecture) needed to sacrifice three important features of web forms viz. Postbacks, ViewState and rich event model. Let's quickly see why this sacrifice is necessary. Remember that in the following sections when I say "web form" I mean the original web form model and when I say "MVC web page" I mean MVC based web forms, though technically they belong to the same inheritance chain.

  • In a web form controls such as Button and LinkButton always submit a form (POST request) to itself. That means under default scheme post backs originating from a web form are handled in the same web form. This contradicts the MVC pattern where a view always talks with a controller and not to itself.
  • First thing to note is that server controls were never designed keeping MVC architecture in mind. They were always intended to be used with "forms based" programming mode. The clever tricks played by web form framework and server controls such as ViewState and events though quite useful in "forms based" model they are of a very little use in MVC architecture. Since a view never submits data to itself (rather it sends it to a controller) ViewState has no role to play in MVC architecture.
  • Web form events can be either "GET" events or "POST" events. Because of the points mentioned above "POST" events of server controls (such as Click event of a Button, SelectedIndexChanged event of GridView and so on) are of little use in MVC.

Considering the above points MVC doesn't offer any direct equivalent of server controls. Under MVC scheme views make use of raw HTML, non-visual helper classes (HTML helpers) and of course third party controls.

Purely for the sake of rough analogy web forms and MVC web pages can be compared like this - The data objects such as DataSets, entities, generic lists etc. go as model under MVC, the markup that renders some UI (typically .aspx files and .ascx files) goes in views and the code that usually goes in event handlers go in controllers.

If you are thinking that the discussion so far is contradicting with the title of the article wait. Though server controls are not a recommended choice under ASP.NET MVC there are situations where you may need to use server controls. Some of these situations include:

  • You are working with server controls for over eight long years. You don't want to dump them immediately just because you wish to use ASP.NET MVC.
  • You are migrating existing ASP.NET web forms based website onto ASP.NET MVC. You simply want to re-use your efforts as much as possible.
  • Your client has asked you to develop a prototype using ASP.NET MVC. You want to do it quickly. Your team is not yet fully acclimatized with ASP.NET MVC.
  • You want to familiarize yourself with MVC concepts first rather than focusing too much on raw HTML and HTML helpers. Over a period of time you plan to master those pieces.
  • You are still evaluating third party MVC controls / helpers. Unless you are convinced that a vendor is meeting your expectations you want to continue using existing controls.

Merely using server controls on an MVC web pages doesn't break MVC architecture in any way. Improper use of the server controls, however, can break the architecture and make your views difficult to understand. When you wish to use server controls in ASP.NET MVC you should keep in mind the following points:

  • Server controls should always post data to a controller. You can use PostbackUrl property of Button and LinkButton controls to achieve this.
  • Server controls and the web forms should never use ViewState. The view will get its data from ViewData collection and send its data to a controller via POST request.
  • MVC web pages can make use of "GET" events (Page_Load for example) if required but they should never make use of "POST" events (SelectedIndexChanged event of GridView for example).

Example Scenario

To illustrate how we can use ASP.NET server controls in ASP.NET MVC web pages we will develop a sample application. In this application we will make use of GridView and DetailsView control. The application adds, edits, deletes and selects records from Employees table. Later we will also add sorting and paging capabilities to our grid.

Just to give you an idea of what we will be building see the following screen shots:
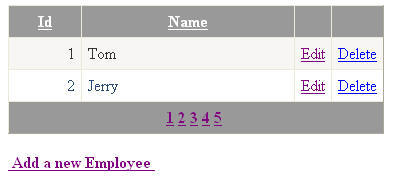
image

Figure 1

We present a list of existing employees to the user. Clicking on "Add a new Employees" link takes you to another page where a new employee record can be added.
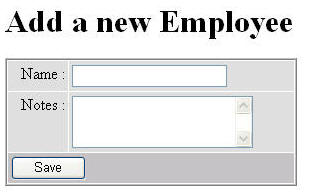
image

Figure 2

Clicking on Edit will take the user to a data entry page where the selected employee record can be edited.
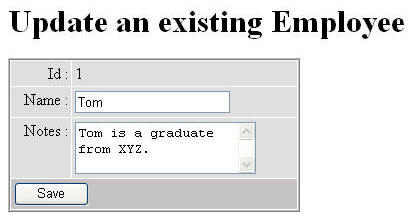
image

Figure 3

Notice that edit and add pages make use of DetailsView control and the listing page makes use of GridView control.

Create an MVC Web Application

Begin by creating a new MVC Web Application in Visual Studio. Select ASP.NET MVC 2 Empty Web Application template as shown below:
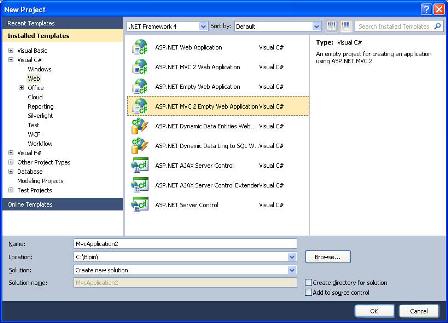
image

Creating a Model

Add a new SQL Server database to the App_Data folder and create a table named Employees. The Employees table contains three columns viz. Id, Name and Notes. Id is an identity column. Add a few sample records in the Employee table for testing purpose.

image

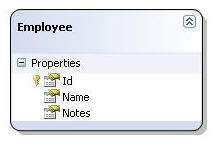
Then add a new LINQ to SQL Classes (.dbml) file to Models folder. Drag and drop Employees table onto its design surface from the Server Explorer. Doing so will create a LINQ to SQL class (Employee) for Employees table. This class will form the model for our MVC pages.
image

Creating a Controller

Now add a new class named EmployeeController in the Controllers folder. The EmployeeController class will have the following action methods:

  • Index : Fetches all the records from Employees table and renders Index view.
  • ShowInsertView : Shows insert view with a DetailsView control in insert mode.
  • Insert : Picks up data submitted by insert view and insert it into the Employees table.
  • ShowUpdateView : Shows update view with a DetailsView control in edit mode.
  • Update : Picks up data submitted by update view and saves it into the Employees table.
  • Delete : Deletes a record from Employees table.

These action methods are discussed next.

public ActionResult Index()
{
    DataClasses1DataContext db = new DataClasses1DataContext();
    IQueryable<Employee> emplist = from rows in db.Employees
                                   select rows;
    ViewData["emplist"] = emplist;
    return View();
}

The Index() action method creates an instance of data context class and then executes a LINQ query to fetch all the rows from Employees table. The returned rows are stored in a ViewData collection so that they can be accessed in the view. Index view is then rendered.

public ActionResult ShowInsertView()
{
    return View();
}

[HttpPost]
public ActionResult Insert(FormCollection collection)
{
    DataClasses1DataContext db = new DataClasses1DataContext();
    Employee item = new Employee();
    item.Name = collection["DetailsView1$txtName"];
    item.Notes = collection["DetailsView1$txtNotes"];
    db.Employees.InsertOnSubmit(item);
    db.SubmitChanges();
    return RedirectToAction("Index");
}

The ShowInsertView() action method simply renders ShowInsertView view. Since we are inserting a new record no data needs to be passed to the view.

Notice the Insert() action method carefully. It is marked with [HttpPost] attribute indicating that only POST requests can invoke this action method. The Insert() method receives the form data as a FormCollection parameter. FormCollection parameter is essentially a key-value collection. See how we retrieve the values entered in the DetailsView control of the view. The DetailsView control will have two textboxes with IDs txtName and txtNotes respectively. As you are probably aware, SP.NET automatically prefixes the IDs of the constituent controls with the parent control ID. So txtName becomes DetailsView1$txtName when the view data is posted. A new Employee object is constructed and inserted in the Employees table. The index view is again rendered so that the user goes back to the employee listing.

public ActionResult ShowUpdateView(int id)
{
    DataClasses1DataContext db=new DataClasses1DataContext();
    var temp = from item in db.Employees
                where item.Id == id
                select item;
    ViewData["emplist"] = temp.ToList();
    return View();
}

[HttpPost]
public ActionResult Update(int id,FormCollection collection)
{
    DataClasses1DataContext db = new DataClasses1DataContext();
    var temp = from item in db.Employees
                where item.Id == id
                select item;
    temp.First().Name=collection["DetailsView1$txtName"];
    temp.First().Notes = collection["DetailsView1$txtNotes"];
    db.SubmitChanges();
    return RedirectToAction("Index");
}

The ShowUpdateView() action method fetches an Employee record whose ID matches with the supplied ID. The ShowUpdateView() method receives an ID from employee listing page (see the first figure). The Employee collection is stored in a ViewData variable and ShowUpdateView view is rendered. Even though the LINQ query is returning a single object we still need to pass it as a generic List beause DetailsView control expects a list or array for the sake of data binding.

The Update() action method is similar to Insert() method we discussed earlier. The only difference is that it modifies an existing record instead of adding a new one. The Id of the employee to be updated is supplied as Id parameter from the view (see the first figure). After the update operation the user is again taken to the employee listing.

public ActionResult Delete(int id)
{
    DataClasses1DataContext db = new DataClasses1DataContext();
    var temp = from item in db.Employees
                where item.Id == id
                select item;
    db.Employees.DeleteOnSubmit(temp.First());
    db.SubmitChanges();
    return RedirectToAction("Index");
}

The Delete() action method simply deletes a specified employee from the Employees table and takes the user back to the employee listing. Notice that unlike Insert() and Update() action methods Delete() method is not marked with [HttpPost] attribute because we are not posting anything to it. The Id parameter will be supplied from the Index view as a part of GET request.

Creating Views

In all we need to create three views viz. Index, ShowInsertView and ShowUpdateView. These views can be seen in the figures shown above.

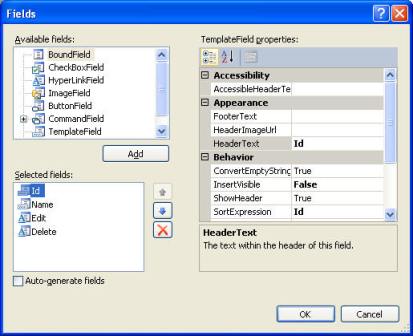
To create the Index view, add a new View in the Views folder. Drag and drop a GridView control on the view design surface. Add two TemplateField columns and two HyperLink columns to the GridView and configure them as follows:
image

The Id and Name template fields are bound with Id and Name columns of the Employees table. The markup after binding the Id template field is shown below.

<asp:TemplateField HeaderText="Id" InsertVisible="False" 
     SortExpression="Id">
    <ItemTemplate>
        <asp:Label ID="Label1" runat="server" 
        Text='<%# Bind("Id") %>'></asp:Label>
    </ItemTemplate>
</asp:TemplateField>

The Edit and Delete HyperLink columns essentially display a hyperlink that points to the ShowUpdateView and Delete action methods respectively.

<asp:HyperLinkField DataNavigateUrlFields="Id" 
    DataNavigateUrlFormatString="~/Employee/ShowUpdateView/{0}" 
    Text="Edit" >
</asp:HyperLinkField>
<asp:HyperLinkField DataNavigateUrlFields="Id" 
    DataNavigateUrlFormatString="~/Employee/Delete/{0}" 
    Text="Delete" >
</asp:HyperLinkField>

Notice how the DataNavigateUrlField and DataNavigateUrlFormatString properties are used. At run time in place of {0} the employee Id for that row will be substituted. Recollect that the ShowUpdateView() and Delete() actions methods accept employee Id as a parameter.

Now place a HyperLink control below the GridView we just configured. Set its Text and NavigateUrl properties to "Add a new Employee" and ~/Employee/ShowInsertView respectively.

Final task is to bind the GridView with the data we pass through ViewData variable. We do this in the Page_Load event as shown below:

protected void Page_Load(object sender, EventArgs e)
{
    GridView1.DataSource = ViewData["emplist"];
    GridView1.DataBind();
}

This complete the Index view. We will revisit Index view when we implement sorting and paging features to the GridView in Part 2 of this article.

Now add another view in the Views folder and name it as ShowInsertView.aspx. Drag and drop a DetailsView control on it and set its DefaultMode property to Insert. This way when the view is rendered the DetailsView will be ready to accept a new entry. The DetailsView will have two template fields for Name and Notes columns respectively (though we won't bind them with anything as such). Since employee ID is identity column we need not include it in the DetailsView. Design the InsertItemTemplate of both the template fields to include textboxes. Then add a Button control to the footer template of the DetailsView and set its Text and PostbackUrl properties to Save and ~/Employee/Insert respectively. This way clicking the Save button will post the form to Insert() action method we coded earlier. Your DetailsView should resemble Figure 2. The markup of DetailsView is given below:

<asp:DetailsView ID="DetailsView1" runat="server" DefaultMode="Insert">
 <Fields>
     <asp:TemplateField HeaderText="Name :">
         <InsertItemTemplate>
           <asp:TextBox ID="txtName" runat="server" 
             Text='<%# Bind("Name") %>' />
         </InsertItemTemplate>
     </asp:TemplateField>
     <asp:TemplateField HeaderText="Notes :">
        <InsertItemTemplate>
           <asp:TextBox ID="txtNotes" runat="server" 
             Text='<%# Bind("Notes") %>' Rows="3" 
             TextMode="MultiLine"></asp:TextBox>
        </InsertItemTemplate>
    </asp:TemplateField>
    </Fields>
    <FooterTemplate>
     <asp:Button ID="Button1" runat="server" 
       PostBackUrl="~/Employee/Insert" 
       Text="Save" Width="75px" />
    </FooterTemplate>
</asp:DetailsView>

Similarly, add a view named ShowUpdateView.aspx and design its DetailsView as shown in Figure 3. This time the DefaultMode property of the DetailsView should be set to Edit. The DetailsView EditItemTemplate has three template fields viz. Id, Name and Notes. The Id column is not editable. The markup of the DetailsView is given below:

<asp:DetailsView ID="DetailsView1" runat="server" DefaultMode="Edit">
    <Fields>
        <asp:TemplateField HeaderText="Id :">
            <EditItemTemplate>
                <asp:Label ID="Label1" runat="server" 
                 Text='<%# Bind("Id") %>'></asp:Label>
            </EditItemTemplate>
        </asp:TemplateField>
        <asp:TemplateField HeaderText="Name :">
            <EditItemTemplate>
                <asp:TextBox ID="txtName" runat="server" 
                  Text='<%# Bind("Name") %>'></asp:TextBox>
            </EditItemTemplate>
        </asp:TemplateField>
        <asp:TemplateField HeaderText="Notes :">
            <EditItemTemplate>
                <asp:TextBox ID="txtNotes" runat="server" 
                  Text='<%# Bind("Notes") %>' Rows="3" 
                  TextMode="MultiLine"></asp:TextBox>
            </EditItemTemplate>
        </asp:TemplateField>
    </Fields>
    <FooterTemplate>
        <asp:Button ID="Button1" runat="server" 
            PostBackUrl='<%# Eval("Id","~/Employee/Update/{0}") %>' 
            Text="Save" Width="75px" />
    </FooterTemplate>
</asp:DetailsView>

Notice the PostbackUrl property of  the Save button carefully. It is set to ~/Employee/Update/{0}. The Update() action needs employee Id as a parameter. The employee Id is passed via Id property of the model. The DetailsView is finally bound with the model in the Page_Load event as shown below:

protected void Page_Load(object sender, EventArgs e)
{
    object emplist = ViewData["emplist"];
    DetailsView1.DataSource = emplist;
    DetailsView1.DataBind();
}

Recollect that we are saving employee object to be edited in a ViewData variable in the ShowUpdateView() action method. The same object is bound with the DetailsView.

That's it! Run the web application and navigate to Index view (your URL should be something like http://localhost:XXXX/Employee/index where XXXX is the port number assigned by development web server). Try adding new employee entries as well as edit existing records.

Disabling ViewState completely

Though our application is functioning as expected, it has one flaw. The individual views still maintain ViewState of server controls (GridView, DetailsView etc.). In MVC applications the ViewState is of little use and if not disabled unnecessarily makes the view heavier. One quick way to rectify the problem is to set EnableViewState property of the page to false. This way the ViewState will be reduced to a small value.

<input type="hidden" name="__VIEWSTATE" id="__VIEWSTATE" 
value="Ly91biiCAQJThIvtDDyFLvl0HWiJ1O/Egm9fLkQEf72LVCkYT/EI
C88uk3xc+Ku3pXDLM6jhDLA7sY6nOh5Hj1Fg93VSiGZHl5/T5O4U69A=" />

Though we have disabled the ViewState using EnableViewState property the control state is still maintained and cannot be disabled as such. If you wish to get rid of this small chunk of ViewState also then add the following overridden methods in the view page server side code.

protected override void SavePageStateToPersistenceMedium(object state)
{
}

protected override object LoadPageStateFromPersistenceMedium()
{
 return null;
}

The SavePageStateToPersistenceMedium() is intended t save ViewState and ControlState information of the page. We override it with an empty implementation so that no ViewState or ControlState is saved. The LoadPageStateFromPersistenceMedium() simply returns null. This way the ViewState hidden field becomes:

<input type="hidden" name="__VIEWSTATE" 
id="__VIEWSTATE" 
value="" />
READ MORE

In Part 1 of this article series you developed a wizard in an ASP.NET MVC application. Although the wizard developed in Part 1 works as expected it has one shortcoming. It causes full page postback whenever you click on Previous or Next button. This behavior may not pose much problem if a wizard has only a few steps. However, if a wizard has many steps and each step accepts many entries then full page postback can deteriorate the user experience. To overcome this shortcoming you can add Ajax to the wizard so that only the form is posted to the server. In this part of the series you will convert the application developed in Part 1 to use Ajax. In the next part you will further enhance the wizard using jQuery so that data is posted to the server only on the final step.

To convert the wizard application developed previously to use Ajax you will use Ajax helper of ASP.NET MVC. To use Ajax helper you need to make certain changes to the application. These changes are listed below:

  • All the four views namely BasicDetails, AddressDetails, ContactDetails and Success will now be partial views.
  • All the action methods will now return the corresponding partial views.
  • The wizard will be launched by Index view and initially BasicDetails partial view will be displayed.

You might wonder as to why we are making these changes. These changes are required since we wish to use Ajax helper. The Ajax helper allows you to submit a form using an Ajax request and the returned response is displayed in a DOM element. For example, you may create a form that makes a post request to an action method and displays a success message returned by the action method in a <div> element. In our specific case when one wizard step is submitted to the server using an Ajax request the server responds by sending the next or previous wizard step. Thus a form submits to the server and renders another form in the browser. This requires that the wizard steps return only the HTML needed to display that step and not the page level items such as <script> and <link>. The page level items just mentioned will go inside Index view that launches the wizard.

Ok. Let's begin our development. Add an Index view to the project and key-in the following markup into it:

@{
Layout = null;
}

<!DOCTYPE html>

<html>
<head>
<meta name="viewport" content="width=device-width" />
<script src="~/Scripts/jquery-1.10.2.js"></script>
<script src="~/Scripts/jquery.unobtrusive-ajax.js">
</script>
<title>Index</title>
</head>
<body>
<div id="divContainer">
  @Html.Partial("BasicDetails")
</div>
</body>
</html>

Notice the above markup carefully. The <head> section of the page contains <script> references to jquery-1.10.1.js and jquery.unobtrusive-ajax.js. These files are necessary for the proper working of Ajax helper. Also notice that the body section contains a <div> with ID of divContainer. This <div> plays an important role in the functioning of the wizard because it houses various wizard steps. As you can see from the code initially it hosts BasicDetails partial view.

Now add a Partial View and name it as BasicDetails. The BasicDetails partial view contains the following markup:

@model WizardInMVC.Models.BasicDetails


@{
AjaxOptions options = new AjaxOptions();
options.HttpMethod = "POST";
options.InsertionMode = InsertionMode.Replace;
options.UpdateTargetId = "divContainer";
}

@using (Ajax.BeginForm("BasicDetails","Home",options))
{
<h1>Step 1 : Basic Details</h1>
@Html.LabelFor(m=>m.CustomerID)<br />
@Html.TextBoxFor(m=>m.CustomerID)
@Html.ValidationMessageFor(m=>m.CustomerID)<br />
@Html.LabelFor(m=>m.CompanyName)<br />
@Html.TextBoxFor(m=>m.CompanyName)
@Html.ValidationMessageFor(m=>m.CompanyName)
<br />
<input type="submit" name="nextBtn" value='Next' />
}

The BasicDetails partial view has BasicDetails class as its data model. It creates an instance of AjaxOptions class. The AjaxOptions class is used to supply various configuration settings while using the Ajax helper. In this case we set HttpMethod, InsertionMode and UpdateTargetId properties. The HttpMethod property indicates the form submission method and it is set to POST in this case. The InsertionMode and UpdateTargetId properties are very important for us. The UpdateTargetId property indicates an ID of a DOM element that will be updated with the response returned from the server. In our example UpdateTargetId is divContainer, the <div> element you added inside the Index view. The InsertionMode property governs how the server response should be added to the UpdateTargetId. The InsertionMode has three possible values - InsertAfter, InsertBefore and Replace. In our example we wish to replace the whole content of divContainer with the response (i.e. a form making a wizard step) and we set it to Replece.

Then a <form> is rendered using Ajax.BeginForm() helper method. The BeginForm() method accepts three parameters viz. action method name, controller name and AjaxOptions object. Inside it contains the same markup as the earlier example (see Part 1 for more details).

On the same lines you need to add AddressDetails, ContactDetails and Success partial views. The complete markup of these partial views is given below:

AddressDetails

@model WizardInMVC.Models.AddressDetails

@{
AjaxOptions options = new AjaxOptions();
options.HttpMethod = "POST";
options.InsertionMode = InsertionMode.Replace;
options.UpdateTargetId = "divContainer";
}

@using (Ajax.BeginForm("AddressDetails","Home",options))
{
<h1>Step 2 : Address Details</h1>
@Html.LabelFor(m=>m.Address)<br />
@Html.TextBoxFor(m=>m.Address)
@Html.ValidationMessageFor(m=>m.Address)
<br />
@Html.LabelFor(m=>m.City)<br />
@Html.TextBoxFor(m=>m.City)
@Html.ValidationMessageFor(m=>m.City)
<br />
@Html.LabelFor(m=>m.Country)<br />
@Html.TextBoxFor(m=>m.Country)
@Html.ValidationMessageFor(m=>m.Country)
<br />
@Html.LabelFor(m=>m.PostalCode)<br />
@Html.TextBoxFor(m=>m.PostalCode)
@Html.ValidationMessageFor(m=>m.PostalCode)
<br />
<input type="submit" name="prevBtn" value='Previous' />
<input type="submit" name="nextBtn" value='Next' />
}

ContactDetails

@model WizardInMVC.Models.ContactDetails

@{
AjaxOptions options = new AjaxOptions();
options.HttpMethod = "POST";
options.InsertionMode = InsertionMode.Replace;
options.UpdateTargetId = "divContainer";
}

@using (Ajax.BeginForm("ContactDetails","Home",options))
{
<h1>Step 3 : Contact Details</h1>
@Html.LabelFor(m=>m.ContactName)<br />
@Html.TextBoxFor(m=>m.ContactName)
@Html.ValidationMessageFor(m=>m.ContactName)
<br />
@Html.LabelFor(m=>m.Phone)<br />
@Html.TextBoxFor(m=>m.Phone)
@Html.ValidationMessageFor(m=>m.Phone)
<br />
@Html.LabelFor(m=>m.Fax)<br />
@Html.TextBoxFor(m=>m.Fax)
@Html.ValidationMessageFor(m=>m.Fax)
<br />
<input type="submit" name="prevBtn" value='Previous' />
<input type="submit" name="nextBtn" value='Finish' />
}

Success

<h3>Customer Data Saved Successfully!</h3>
@Html.ActionLink("Add Another Customer","Index","Home")

Notice that all the partial views that use Ajax helper declare their own AjaxOptions object and pass it to BeginForm() method.

Once you create all the partial views modify the action methods to return partial view instead of view. The following code shows the modified BasicDetails() action method:

[HttpPost]
public ActionResult BasicDetails(BasicDetails data, 
string prevBtn, string nextBtn)
{
  if (nextBtn != null)
  {
    if (ModelState.IsValid)
    {
      Customer obj = GetCustomer();
      obj.CustomerID = data.CustomerID;
      obj.CompanyName = data.CompanyName;
      return PartialView("AddressDetails");
    }
  }
  return PartialView();
}

As you can see there is no change in the logic of the action method. The only difference is that instead of View() method it uses PartialView() method. Also change AddressDetails() and ContactDetails() action method to return partial views instead of views. If you run the wizard you will find that even after navigating to different wizard steps the URL in the browser's address bar remains unchanged indicating that Ajax requests are being made to the server rather than full page postback.

image

As you can see even if you are on Step 2 the address bar still points to /home/index.

That's it! In the next part you will learn to develop a wizard that replies more on client side technologies and posts data to the server only at the last step.

READ MORE
...