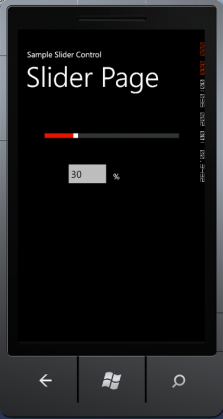
This article shows how to create a Slider that has its position bound to the value in a TextBox. Changes in the value of either the Slider or TextBox are reflected in each other.
UI
1 . Drag and drop a Slider control, TextBox and TextBlock from the ToolBox to the design view of the
    MainPage.xaml file.

2. Slider Control has 5 main properties - Minimum, Maximum, Value, Small Change & Large Change.

3. 'Minimum' reflects the minimum value a slider control can possess, here we are setting it to 10.
     Similarly, 'Maximum' reflects the maximum value a slider control can possess, here we are setting it to
     100. *'Value'- as the name suggests depicts the value the slider control currently possess, by default
     we are setting it to 30.

4. 'Small Change' & 'Large Change' are the values by which the slider's value will be incremented on
       using the thumb of slider. Here we are setting the value of 'Small Change' as '10' and 'Large Change'
      as 20.

 5. Mathematically, Minimum Value <= Value <= Maximum Value

 6. After placing the controls, the screen look something like as shown in screenshot.

XAML Code:
    <!--ContentPanel - place additional content here-->
    <Grid x:Name="ContentPanel" Grid.Row="1" Margin="12,0,12,0">
        <Slider Height="84" HorizontalAlignment="Left" Margin="45,51,0,0" Name="slider1"
                VerticalAlignment="Top" Width="369" Minimum="10" Maximum="100" Value="30"
                SmallChange="10" LargeChange="20"/>
        <TextBox Height="72" HorizontalAlignment="Left" Margin="107,141,0,0" Name="textBox1"
                VerticalAlignment="Top" Width="120" />
        <TextBlock Height="30" HorizontalAlignment="Left" Margin="233,169,0,0" Name="textBlock1"
          Text="%" VerticalAlignment="Top" />
    </Grid>
</Grid>
Binding the Text Box with the Slider's value
 <TextBox Height="72" HorizontalAlignment="Left" Margin="107,141,0,0" Name="textBox1"
   Text="{Binding Value, ElementName=slider1}" VerticalAlignment="Top" Width="120" />
